As you build your bots, it's important that you understand how to add, delete, clone, and test Modules, edit Module messages and connections, and add Tags. Below, we'll address the platform features you'll use to do so successfully:
Once you've edited your Modules, remember to save your changes. To push these edits to a live chatbot, you must also publish after saving.
Add new module
To add a Module, you can either right-click on the canvas or use the right sidebar menu, then choose the desired Module type.
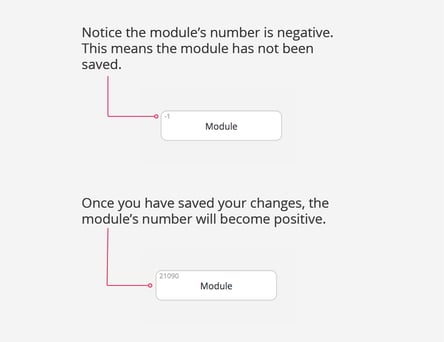
Notice how the new Module has a number in the upper left corner? When you've just created the Module, it will be a negative number. After saving, a positive number will appear. We always recommend saving right after creating a Module.
The Module ID can be used as a unique identifier for conversational flows. For example, if you'd like to train the AI for intents that trigger the Module's answer accordingly, you can tag the ID to the name of the AI intent. This can help you organize and keep an internal overview of your conversational flows.
If you hover your cursor over a Module, a preview of the text within that Module appears. You'll also see various features displayed around the Module, as shown here:
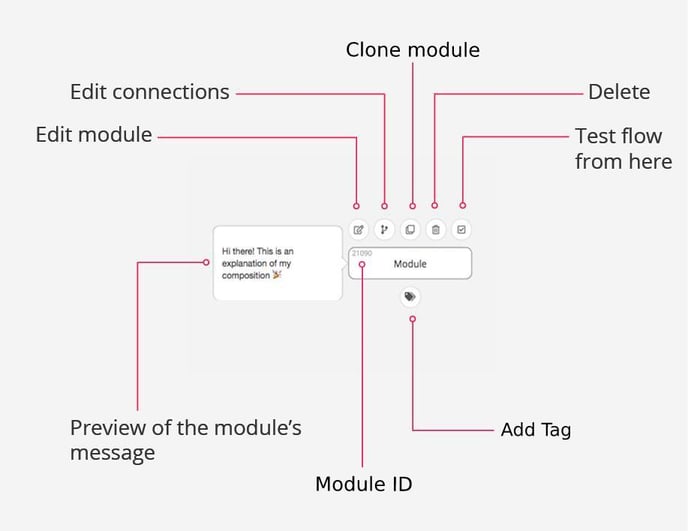
Edit module
This button leads you to the modal window where you can edit the message of your Module. You can also edit by double-clicking the Module.
Edit connection
This is where you can connect the Module to other Modules. This allows the chatbot to send your customer to another designated Module based on their input. You can also implement Webhooks, set Custom Variables, and define the Module's connection to the desired Fallback message.
Learn more about Module Connections, then read about Global Connections.
Clone module
This function will create a copy of your Module.
If you'd like to clone multiple Modules at one time, select those Modules in the canvas and copy and paste them using Ctrl+C then Ctrl+V (or ⌘ Command+C then ⌘ Command+V on a Mac). Learn more about this action's effect on connections in our guide for how to copy and paste Modules across bots.
Delete
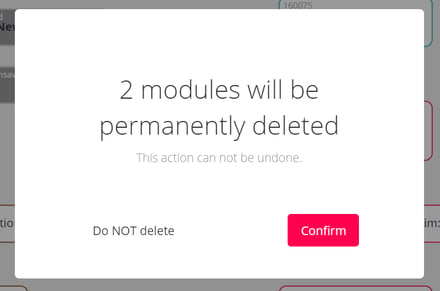
Selecting the trash can icon will lead to the permanent deletion of the Module(s).
All Modules marked in bold will be deleted.
This action is permanent, so you'll always receive a notification that shows how many Modules you're about to delete. With this, you can make sure to only delete the desired Module(s) by verifying the indicated number is correct. You can select "Do NOT delete" if you change your mind.
You can see this illustrated in the following image:
Test flow from here
With this feature, you can check the conversation flow starting at this Module.
This function differs from the Navigation bar's "Test" button, which always tests your bot's communication flow from the beginning. In contrast, the "Test flow from here" function only tests from this specific place in the flow.
This is especially useful when your bot becomes bigger and more complex, so you don’t have to start over every time before being able to test what you're really interested in.
Learn more about testing and refining your bot using the Certainly Widget.
Add Tag
When you hover your cursor over a Module, the Tag button will appear below the Module. This feature is used to gather data on specific parts of your chatbot, allowing you to track metrics like how many users interacted with your bot, were handed over to customer support, or ended up in a fallback path. Adding Tags can also make your bot easier to navigate in the canvas.
Using Tags is as simple as selecting the Tag icon that appears, then choosing the desired Tag to add to the Module. There are some predefined Tags to get you started, but you can track custom data points by selecting "Other tags".

To begin, we recommend adding Tags to Starting, Fallback, and Handover Modules, places in the flow where you'd like to evaluate the helpfulness of the bot's response, and Modules that mark conversions or the completion of a flow. You can also use Tags to identify Modules containing Webhooks or a Natural Language Generation (NLG) integration like ChatGPT.
A more specific Tags setup may be required based on your Reporting purposes.