Module Connections might seem a bit complex at first glance! But, assuming you've already gained some initial insights about Certainly's Platform, this article will use what we've learned from previous customers to help smoothly guide you through Module Connections.
We'll show you how to:
- Access a Module's Connections
- Set up a Module Connection
- Shortcuts for new action configuration
- Define a Module Connection's condition(s)
- Define a Module Connection's action(s)
- Switch off Global Connections
Access a Module's Connections
You can access a Module's connections when you're in edit mode by selecting the Connections tab at the top of a Module's window. If you're not in edit mode, hover over the Module and choose "Edit connection" from the menu that appears above.
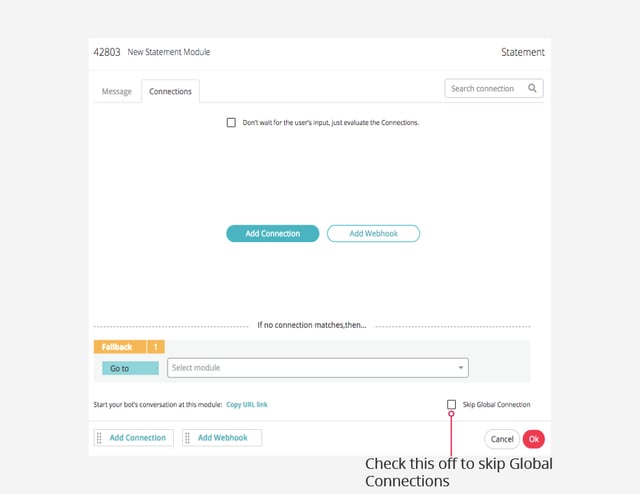
The screenshot below provides you with an overview of the Module Connections setup:
Set up a Module Connection
Before creating a connection, think about the possible end user answer to this Module's bot message.
As the architect of the conversational flow, please remember that end users' answers can sometimes be difficult for the bot to understand. Assuming a worst-case scenario for the end user input will help you equip the bot with the best possible connections.
To add a connection, click "Add Connection". Normally, a connection consists of a condition and an action. However, a connection does not require a condition. In certain contexts, it makes sense to delete the condition, which will be explained in greater detail below.
Note that in the following screenshot, the "Don’t wait for the user’s input, just evaluate the Connections" checkbox is unticked. In other words, the bot waits for the end user's input before proceeding. In those cases, a connection must have some kind of input for the conversational flow to continue.

Conversely, if the "Don’t wait for the user’s input, just evaluate the Connections" checkbox is ticked, the bot will act without any user input.
All connections are draggable to change their order. The bot always reads the connections sequentially, starting from the first connection. This is why the hierarchy of the connections must be taken into account.
Shortcuts for new action configuration
When creating your bot, you will need to configure multiple different actions (Connections, webhooks or set variables).
To simplify the process for you, you have several shortcut buttons available within the connection editor.

These buttons will be locked if a connection is currently being configured, but will become available as soon as it is completed.

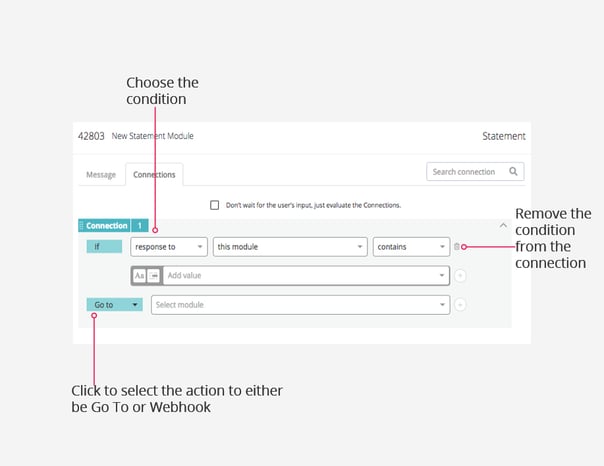
Define a Module Connection's condition(s)
Different types of conditions are supported. However, the majority of conditions break down to the following simple If-clauses for the Module Connection, which we'll review below:
Response to
Create a connection based on keywords or Suggested Replies.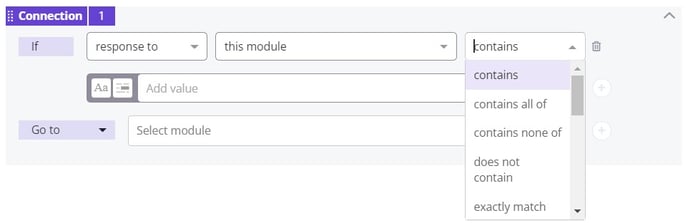
The following conditions can be applied when "response to" is selected: contains, contains all of, contains none of, does not contain, exactly match, begins with, does not begin with, ends with, does not end with, equals, does not equal, less than, greater than, greater than or equal to, less than or equal to.
AI understands
Define a connection based on Intents from your AI Manager. 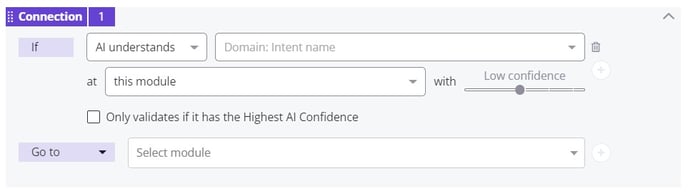
You can adjust the level of confidence with which it must understand the Intent, as well as whether it should only validate if it has the highest AI confidence.
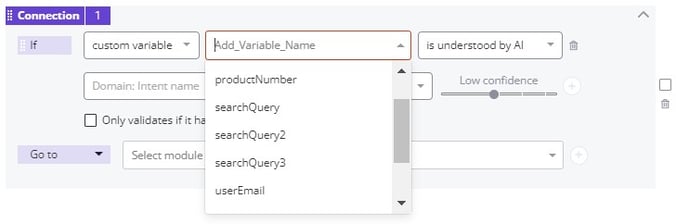
Custom variable
Use Custom Variables as conditions for a connection.
After the "custom variable" condition type is selected, any variables previously defined in a Module Connection or Webhook's response mapper can be chosen from a drop-down menu. Alternatively, you can add a new variable.
There are also Custom Variables that set themselves (meta variables) without any action required of the user.
The following conditions can be applied to the Custom Variable: is understood by AI, contains, contains all of, contains none of, does not contain, exactly match, begins with, does not begin with, ends with, does not end with, equals, does not equal, less than, greater than, greater than or equal to, less than or equal to, exists, doesn't exist, is empty, is not empty.
Below, you can see an example where the "exactly match" variable condition is used.
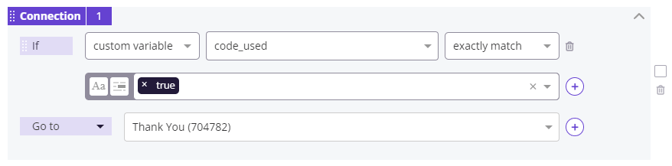
In this case, we check to see if a Shopify discount code has already been used as part of the checkout process. If the variable code_used exactly matches "true", that discount cannot be applied to the order, so the user is thanked for their purchase and directed to the checkout page.
A/B testing
A/B testing is a common tool for marketers, and you can also use it for your chatbot's messages. Test how different messages work on your end users to find out which one runs best.
You prepare the A/B testing by setting it up in a connection of a Module. What comes next are the messages (Modules) you would like to compare with each other. Namely, you can compare the performance of the connection to Module A to the connection to Module B to the connection to Module C, and so on.
In theory, you can compare 101 connections to each other. This is possible because each A/B connection is assigned a newly created, random ID between 0 and 100 (101 possibilities in total).
Define the condition further by selecting if the ID for that specific selection must equal, must be greater than, or less than the ID selected by using the slider.
Users filter
By using a filter as part of a connection, you can target a connection based on user segmentation that was previously defined by using the Filter feature.
Channel
Send your chatbot visitors to a specific Module based on what channel they have entered the chatbot from. These are the channels you can select for this Module Connection condition:
- WebChat
- Zendesk
- Skype
- Sunshine
- UIB
- Bot2Bot
Jinja2 template
For more complex conditions, you can also add a Jinja2 template.
This allows for further customization, such as accessing internal Custom Variables like {{certainly.reply}} or the results of a Webhook execution {{wh.response}}.
Learn more about using Jinja2.
Define a Module Connection's action(s)
Each condition requires an action. Set up the action(s) of a Module Connection based on the previously defined conditions, conversational context, and assumed worst-case scenario for the end user's input to that Module's bot message(s).
An action can be to "Go to" another Module (default action), fire a "Webhook", or "Set [a] variable". Change an action by activating the drop-down menu embedded in the action field. Explanations of each action are below.
Go to
This action simply requires a Module ID or a Module's name to be inserted in the following "Set module" text field. Clicking in the text field will activate a drop-down menu where you can scroll through all existing Modules. You can type the name or ID number of the desired Module directly into the field.
You are also able to connect to a Module that does not yet exist. Create this new Module directly in the "Set module" text field by selecting "Create New Module".
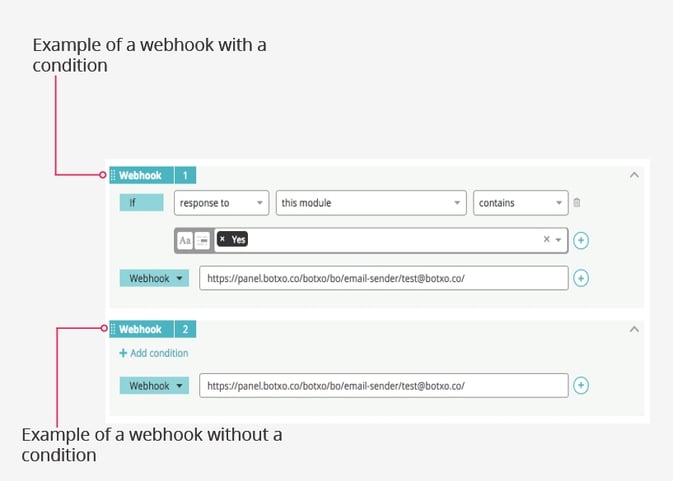
Webhook
You can trigger webhook executions during conversation time by adding a wehook action in the connection editor. To achieve this, click on the "Add Webhook" button in the connection editor. Inserting a Webhook does not require a condition to be defined. You may delete the condition by clicking on the trash bin icon next to the condition.
Select or insert the desired webhook in the "Select Webhook" text field next to the action field.
Set variable
You can create Custom Variables within a Module's connections as well. You can achieve this by clicking the "Add Set Variable" button in the connection editor.
Once you have designated the name of the Custom Variable, you add the value with which the variable will be set. You can select "this module end-user reply" or "previous module end-user reply" to set the variable with the end user's (potential) input. You can also set a "custom value" that you manually define or add a "Jinja2 template" for further customization.
You can set as many Custom Variables as you'd like within a Module's Connections. Remember, these Connections can be modified by the If-clause conditions explained above.
Read more about storing the end user reply in a Custom Variable.
Switch off Global Connections
Global Connections are all the conditions defined for your entire bot. You may understand Global Connections as a book of instructions that stores your bot's overall responses and connections.
In contrast, Module Connections only hold for the specific module you are working on. Here, the bot's actions and/or responses for the next step within the conversational flow are defined.
If your bot's setup follows the rule to always read Global Connections before Module Connections, it can be useful to deactivate this rule for certain Modules. This is why the Skip Global Connection feature can be very valuable.
Switch off Global Connections by ticking the checkbox Skip Global Connection at the bottom of the Module window.