Use Jinja2 to increase the functionality of your Certainly chatbot

This article offers an introduction to how you can use the Jinja2 templating language in our Webhook Builder and your chatbot's Modules.

If you'd like to use Webhooks and build an integration between your chatbot and another system, you'll often need to transfer data from the chatbot to the Webhook and back. This is achieved by using Jinja2 code, for which we want to share some tips and tricks with you. 

We will explore the following:

Mapping a variable

This is the most used feature. In this section, we'll go over:

Storing and transferring data through a Webhook

In the example below, we've created our own Custom Variable inside a Module Connection in order to, for example, store a user's full name to send it to a third-party system.

mceclip0.png

If we want to pass the variable defined in the picture above into a Webhook, all we need to do is define the variable in the JSON body of the Webhook we are using, with the Jinja syntax. This can be done by simply opening the Webhook in the Webhook Builder and adding the variable to the body, as shown below: 

{
	"userName":"{{userName}}"
}

For testing purposes, like in cases where you want to run the Webhook to see if it works, replace the Custom Variable with real values. It can make sense to hardcode values either for testing or in cases where we need a value to be the same for every chat user.

In the following example, we feed the Webhook the name "Test name" as the user name. This will thereby be automatically stored as the name of whoever tests the Webhook within the bot.

{
	"userName":"Test name"
}

Retrieving data from a Webhook

If you're looking to retrieve specific data from a Webhook, this can be accomplished by creating Custom Variables in the Webhook Builder and connecting those variables to a specific field from the Webhook’s response.

As an example, we'll use the following response, which displays the data retrieved during a chat in which the Webhook was used. We can, for instance, see the time and date of when the chat was created, the user's e-mail address, and whether the chat is still open at the time.

Take a look here:

{
	"data": {
		"channel": "contact_form",
		"status_updated_at": null,
		"queue_id": "01cf9b1e-363a-4877-9d83-683fed0962b5",
		"created_at": "2020-03-02T11:10:08.7487",
		"status": "open",
		"attributes" : {
			"from_email": "test@gmail.com",
			"subject": "Certainly"
		},
		"id": 22,
		"requester_id": "a95671e5-6703-47d8-8d66-e34d16e0fdd3",
		"queued_at": "2020-03-02T11:10:08.9317",
		"direction": "inbound"
		}
	"paging": null
}

We can extract any information from this set of data and save it as a Custom Variable inside our chatbot. This allows us to then use it in further communication with the user, transfer it to a human agent during handover, and more.

All we have to do is set the variables we want to store the data in within our Webhook Builder:

  • Custom Variable Name: Any name you want to give it. This variable name can be found inside the bot afterward, and you can print it or use it for any purpose. It is not visible to the user.
  • Response Mapper: This is where we insert Jinja code. This part makes the back-end connection between the Webhook response and the variable to be created. {{data.status}} would translate into >> print the “status” field from the “data” object.
  • Evaluation Results: Here you can see the result of the mapping, determine if the code is being executed correctly, and check if you're getting all the information you want to save.

You can also do some more complex Jinja instructions through the use of booleans:
mceclip6.png

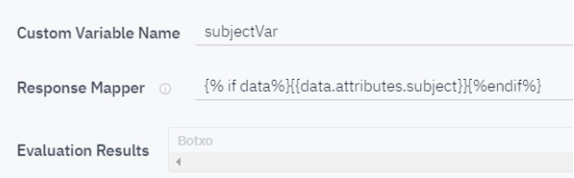
{% if data%}{{data.attributes.subject}}{%endif%}

In translation: If this data exists, print the specific subject from the retrieved data attributes. 

The “{%” is used when you deal with more complex code and want to analyze if it fulfills a certain condition or if you want to retrieve data from within a list, which we'll explore next.

Extracting data from a list

Data Example:

{
	"list_of_elements":[
		{"userName":"alpha", "secret":"122314"},
		{"userName":"beta", "secret":"2324234"},
		{"userName":"delta", "secret":"543423"}]
}

If you want to access a specific element in the list, you can do so with {{list_of_elements[0]}} for the first element and {{list_of_elements[1]}} for the second (0 always represents the first item).

Following this logic, you can access any specific element in the list. Similarly, you can access parameters of those elements: {{list_of_elements[0].username}}.

When trying to access all elements of the list, here is how you make a loop:

Code Example:

{% for element in list_of_elements%}	//we cycle trough each element in the list
	{{element.userName}}		//we print the username
	{{"Secret: " +element.secret}}	//we print the secret and a string
{%endfor%}

Example Result:

alpha
Secret: 122314
beta
Secret: 2324234
delta
Secret: 543423

Extracting data from a list without a name

Data Example:

{[
		{"userName":"alpha", "secret":"122314"},
		{"userName":"beta", "secret":"2324234"},
		{"userName":"delta", "secret":"543423"}

]}

In this example, the list has no name attributed to it, so it is a bit confusing to point to it. The solution is to use: {{wh.response}}

Similar to the previous example, you can use: {{wh.response[0]}},{{wh.response[1].secret}}

For loops:

{% for wh.response %}	//we cycle through each element in the list
	{{element.userName}}		//we print the username
	{{"Secret: " +element.secret}}	//we print the secret and a string
{%endfor%}

Filters

Filters are pre-made pieces of code that have the function of modifying the element in a certain way.

Format:

{{element | filter}}

Element: can be any data, object, or field.

Example Description
{{element | striptags}} Removes all HTML tags from the element.
{{element | tojson}} Transforms the element into a JSON object.
{{element | replace("text to be replaced","new text")}} Replaces all occurrences of "text to be replaced" with "new text" provided as a second parameter. "new text" can also be empty.
{{element|length}} Returns the length of a string or the number of elements in a list.
Find an extensive list of Jinja2's built-in filters in the Jinja2 documentation. Here, we'll cover:

List Filter

This filter allows you to identify a Custom Variable as a list for it to be rendered in a specific way. The format is very simple:

[customVariable key=custom_variable type=list]

To work properly, a list with the correct JSON list format needs to be created (dynamic or static) from a Webhook response or a Module Connection. Screenshot 2022-10-20 at 11.20.23

You can apply this filter in a Bot Message or as a Suggested Reply, as shown here:Screenshot 2022-10-20 at 11.30.26
If done correctly, the result should appear as such:
Screenshot 2022-10-20 at 11.34.06

This is especially useful for Suggested Replies as it allows you to pass dynamically created values either from a WH response or from customer-collected data to make a more targeted bot-user experience.

Date Time Filter

This filter will give you the actual date and time at the moment when it is used. The format is:

{{"%d-%m-%Y %H:%M"| date_time(timeZone, timeDelta)}}

Can be applied in:

  • The body of a Webhook
  • In the Webhook response mapper
  • In Module Connections of the type "jinja template"
  • In Module Connections that use the action "Set Variable" while using a Jinja template
Details:
  • "%d-%m-%YT%H:%M:%S" - can be modified to display the time how you want it
    • d  = days
    • Y = year
    • m = months
    • H = hours
    • M = minutes
    • S = seconds
      You can arrange or remove any of them as you wish, and "-" can also be changed to / or any other delimiter.
  • timeZone - the time zone you want to use. Example: 'Europe/Madrid'
  • timeDelta - represents the number of days ahead or behind the current date. Example: 3
    • A number of days to add (or subtract) to the current date.
    • It also accepts a float number if you need a time shift of less than a day. For example, -0.041 6 will result in an hour before (1/24 = 0.0416).
    • 4 will move the date ahead by 4 days
    • -4 will move the date behind by 4 days

Examples of format:

Jinja Template Output
{{ "%H:%M" | date_time }} 13:49
{{"%d-%m-%Y" | date_time}} 23-12-2019
{{ "%d-%m-%Y %H:%M"| date_time }} 23-12-2019 13:49
{{"%d-%m-%Y %H:%M"| date_time('Europe/Madrid')}} 23-12-2019 13:49
{{"%d-%m-%Y %H:%M"| date_time('Europe/Madrid', 3)}} 26-12-2019 13:49

You can find a full list of date format values in the Python documentation.

One example of use would be a connection inside the bot where you check for opening hours:mceclip0.png

Taking weekdays into account:

If you need to include the day of the week in your schedule of open hours, you can do so with: 

{%- set day = "%w" | date_time("Europe/Amsterdam") | int -%}

Note that the weekday is returned as a decimal number, where 0=Sunday, 1=Monday... 6=Saturday.

So, consider we need to check opening hours for this example schedule:

Mon(1) - Thu(4): 09:00 - 18:00
Fri(5): 09:00 - 16:00
Sat(6), Sun(0): Closed

We can use the following Jinja code in the Module's Connection:

{%- set time = "%H%M"| date_time("Europe/Amsterdam")|int -%}
{%- set day = "%w"| date_time("Europe/Amsterdam")|int -%}
{%- if ((900<=time<=1800 and 1<=day<=4) or (900<=time<=1600 and day==5)) -%}
Open
{%- else -%}
Closed
{%- endif -%}

Time to Unix Filter

In some cases, it's helpful to compare two dates in order to determine, for example, if we should display content or if the visitor applies for a condition of a benefit, warranty, or discount.

To do so, we would rely on our new tool, the time_to_unix filter:

{{"2022-09-08T09:44:24" | time_to_unix('%Y-%m-%dT%H:%M:%S', 'Europe/Madrid') }}

Can be applied in:

  • The body of a Webhook
  • In the Webhook response mapper
  • In Module Connections of the type "jinja template"
  • In Module Connections that use the action "Set Variable" while using a Jinja template
Details:
  • It returns a number in milliseconds passed since Jan 1st, 1970 (0).
  • It will receive a string with a time format and return the unix value for that timestamp. The filter will accept 2 params:
    • "%d-%m-%YT%H:%M:%S" - can be modified to display the time how you want it
      • d  = days
      • Y = year
      • m = months
      • H = hours
      • M = minutes
      • S = seconds
        You can arrange or remove any of them as you wish, and "-" can also be changed to / or any other delimiter. Note: need to match format inside filter param.
    • timeZone - (optional) the time zone you want to use. Example: 'Europe/Madrid'

Examples of format:

Jinja Template Output
{{ "2022-09-01" | time_to_unix('%Y-%m-%d') }}

1661983200000.0

{{"01/11/2021T05" | time_to_unix('%d/%m/%YT%H','Europe/Madrid'}}

1635739200000.0

{{"2022-09-01T10:50:32"| time_to_unix('%Y-%m-%dT%H:%M:%S', 'Europe/Madrid')}}

1662022232000.0

Having the date in unix format allows us to compare the difference between a specified date and the current date without applying complex conditions. For instance, to calculate the difference in days between the order date and today:

{%- set current_date="unix"|date_time -%} 
//"1662649356920.472"
{%- set order_date = "2022-08-26"|time_to_unix('%Y-%m-%d', 'Europe/Madrid') -%}
//"1661464800000.000"
{%- set difference_days = (current_date - order_date)/1000/60/60/24 -%}
//13.721159084455701

In this example, we do the following:

  1. Get the current date in unix format (you can apply timezone and delta to that one as well).
  2. Use the new filter to pass the order date as a string and save it in a variable.
  3. Divide the result of current_date minus order_date by 1000 to convert it to seconds, by 60 to convert it to minutes, by 60 to convert it to hours, and then by 24 to convert it to days, all to get the difference between "Thu Sep 08 2022 17:02:36 GMT+0200 (Central European Summer Time)" and"Fri Aug 26 2022 00:00:00 GMT+0200 (Central European Summer Time)".

We could base a condition for returns or warranty based on the difference_days result inside our connections and Webhooks in order to determine a particular flow or action.

Example of Jinja mapping for Dynamic Cards

In the event that you want to print the response from a Webhook as Dynamic Cards, the response may need to be mapped in a certain way in order for it to be displayed as a carousel of cards in the conversation.

The default JSON structure for Cards is as follows:

[{  
  "title":"Card Title",
  "subtitle":"Card subtitle",
  "is_shareable":false,
  "image_destination_url":"http://web.site/to/forward/user/",
  "image_source_url":"https://www.web.site/with/img.jpg",
  "buttons":[]
}]

In some cases, when we create a Webhook to retrieve data from a third-party API, the response will exactly match the structure seen above. However, there may be situations in which the response differs from the default structure.

See the example Webhook response below:

{
"count": 2,
"next_page": "https://helpcenter.zendesk.com/api/v2/help_center/articles/search.json?page=2&per_page=25&query=a",
"page": 1,
"page_count": 3,
"per_page": 25,
"previous_page": null,
"results": [
{
"draft": false,
"outdated_locales": [],
"body":"......",
"promoted": false,
"comments_disabled": false,
"outdated": false,
"edited_at": "2020-10-29T16:09:15Z",
"position": 0,
"created_at": "2020-06-01T00:49:01Z",
"name": "Creating a ticket in Zendesk Support",
"permission_group_id": 154179,
"author_id": 360687804520,
"url": "https://helpcenter.zendesk.com/api/v2/help_center/en-us/articles/360014149860.json",
"section_id": 360003221899,
"vote_sum": 1,
"updated_at": "2021-01-19T14:53:37Z",
"title": "Creating a ticket in Zendesk Support",
"locale": "en-us",
"vote_count": 1,
"id": 360014149860,
"user_segment_id": null,
"html_url": "https://support.helpcenter.ai/hc/en-us/articles/360014149860-Creating-a-ticket-in-Zendesk-Support",
"result_type": "article",
"snippet": "These custom variables should be seen as a storage location for data either collected from the end user reply to a given",
"label_names": [
"creating a ticket",
"zendesk support"
],
"source_locale": "en-us"
},
{
"draft": false,
"outdated_locales": [],
"body":"......",
"promoted": false,
"comments_disabled": false,
"outdated": false,
"edited_at": "2019-08-06T13:36:47Z",
"position": 0,
"created_at": "2019-03-27T10:54:25Z",
"name": "Supported tokens to be used in modules",
"permission_group_id": 154179,
"author_id": 360687804520,
"url": "https://helpcenter.zendesk.com/api/v2/help_center/en-us/articles/360003873020.json",
"section_id": 360001266459,
"vote_sum": 1,
"updated_at": "2020-08-20T14:32:52Z",
"title": "Supported tokens to be used in modules",
"locale": "en-us",
"vote_count": 1,
"id": 360003873020,
"user_segment_id": null,
"html_url": "https://support.helpcenter.ai/hc/en-us/articles/360003873020-Supported-tokens-to-be-used-in-modules",
"result_type": "article",
"snippet": "20 (2): When provided as metadata by the channel (only Facebook for now) (3): Can be done when selecting \"ResponseTo\" as a",
"label_names": [
"response to",
],
"source_locale": "en-us"
}]
}

If we were to save the entire response above as it is inside a Custom Variable and attempt to print it in the conversation to display some Cards, we would be unsuccessful as the structure does not match what we allow in Cards. 

In order to make the Webhook response above be rendered as Cards, we need to transform the response so that it fits with the default structure.

Next, we'll provide examples for:

Simple card list

Variable Name Response Mapper
dynamic_Cards
[{% for result in results%}
{"image_source_url":"{{result.body.url}}",
"title":{{result.title|striptags|tojson}},
"subtitle":{{result.body|striptags|truncate(60,True)|tojson}},
"image_destination_url":"{{result.html_url}}",
"is_shareable":false,"buttons":[{ "options":
{ "newtab_url":"{{result.html_url}}", "window_size":"tall"},
"is_active":true, "type":"web_url_tab", "title":"Read more"
}]
}{% if not loop.last %},{% endif%}{% endfor %}]

Simple card list (only first 5)

This example is almost the same as the previous one. The only difference is that we don't go through the entire list of elements — just the first 5.

By adding [:5] after "results", you take only the first 5 and skip the rest. This is useful when you don't want to overwhelm the end user with too much information.

Variable Name Response Mapper
dynamic_Cards
[{% for result in results[:5]%}
{"image_source_url":"{{result.body.url}}",
"title":{{result.title|striptags|tojson}},
"subtitle":{{result.body|striptags|truncate(60,True)|tojson}},
"image_destination_url":"{{result.html_url}}",
"is_shareable":false,"buttons":[{ "options":
{ "newtab_url":"{{result.html_url}}", "window_size":"tall"},
"is_active":true, "type":"web_url_tab", "title":"Read more"
}]
}{% if not loop.last %},{% endif%}{% endfor %}]

*You can change the number from [:5] to adjust how many elements will be displayed

Card list with filter

In some cases, you will have a long list of articles, and only some of them will have to be displayed. Using a filter, you can include only some or exclude other articles. In this example, we use user_segment_id to do the filtering. Depending on your use case, you can use any criteria, such as the length of the title or the date of creation.

Variable Name Response Mapper
dynamic_Cards
[{% set filter = [550249, 140885, 140785] %}
{% for result in results if result.user_segment_id in filter %}
{"image_source_url":"{{result.body.url}}",
"title":{{result.title|striptags|tojson}},
"subtitle":{{result.body|striptags|truncate(60,True)|tojson}},
"image_destination_url":"{{result.html_url}}",
"is_shareable":false,"buttons":[{ "options":
{ "newtab_url":"{{result.html_url}}", "window_size":"tall"},
"is_active":true, "type":"web_url_tab", "title":"Read more"
}]
}{% if not loop.last %},{% endif%}{% endfor %}]

*This filter works by article segment Id ( [550249, 140885, 140785] ). Using this example you can build what you need.

Card list with filter (only first 10)

In cases when we want to combine filtering and display a limited number of cards, we can not know if the first 5 or 10 will pass the filtering criteria. As a solution, we can count each card that is displayed and stop when our count reaches 10 or any other number we want.

This example uses the filters from the previous example and adds a counting feature to limit the number of displayed cards.

Include only specific user_segment_id

Variable Name Response Mapper
dynamic_Cards
[{% set ftotal= {'total': 0} %}{% set filter = [550, 1408, 1407] %}
{% for result in results if result.user_segment_id in filter %}
{% if ftotal.update({'total': ftotal.total + 1}) %}{% endif %}
{%if ftotal.total<=10 %}{% if ftotal.total !=1 %},
{% endif%}{"image_source_url":"{{result.body.url}}",
"title":{{result.title|striptags|tojson}},
"subtitle":{{result.body|striptags|truncate(60,True)|tojson}},
"image_destination_url":"{{result.html_url}}",
"is_shareable":false,"buttons":[{ "options":
{ "newtab_url":"{{result.html_url}}", "window_size":"tall"},
"is_active":true, "type":"web_url_tab", "title":"Read more"
}]
}{% endif%}{% endfor %}]
 

Include all except one user_segment_id

Variable Name Response Mapper
dynamic_Cards
[{% set ftotal= {'total': 0} %}
{% for result in results if result.user_segment_id != 343435435434%}
{% if ftotal.update({'total': ftotal.total + 1}) %}{% endif %}
{%if ftotal.total<=10 %}{% if ftotal.total !=1 %},{% endif%}{"image_source_url":"{{result.body.url}}",
"title":{{result.title|striptags|tojson}},
"subtitle":{{result.body|striptags|truncate(60,True)|tojson}},
"image_destination_url":"{{result.html_url}}",
"is_shareable":false,"buttons":[{ "options":
{ "newtab_url":"{{result.html_url}}", "window_size":"tall"},
"is_active":true, "type":"web_url_tab", "title":"Read more"
}]
}{% endif%}{% endfor %}]