In Message Reports, you can sort different types of data from your chatbot in columns. You can find this feature in the Section menu of the Navigation bar.
Message Reports is a legacy feature. We recommend using the Message Insights Report for an overview of all user messages that lead to tagged Modules.
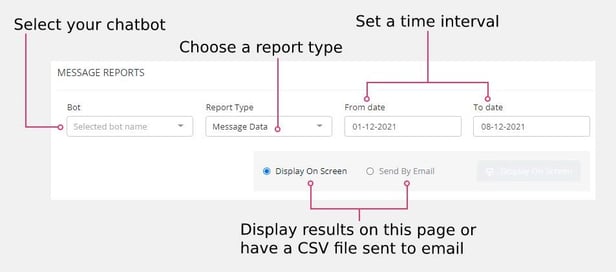
Once you've arrived at the Message Reports landing page, you'll need to choose the chatbot for which you'd like to review the data. Then, select the period you want to view data from.
You'll also choose which Report Type you want to receive: Message Data, Standard, Advanced, or Content Management. Each type has different categories of data available for viewing, which make up the columns of your report(s). We explain these types in greater detail below.
To view your results, you can "Display On Screen" or "Send By Email". The view you select impacts how your data is organized, so we've divided this article by those view options.
The "Display On Screen" view is limited to a time interval of up to 15 days.
Display On Screen
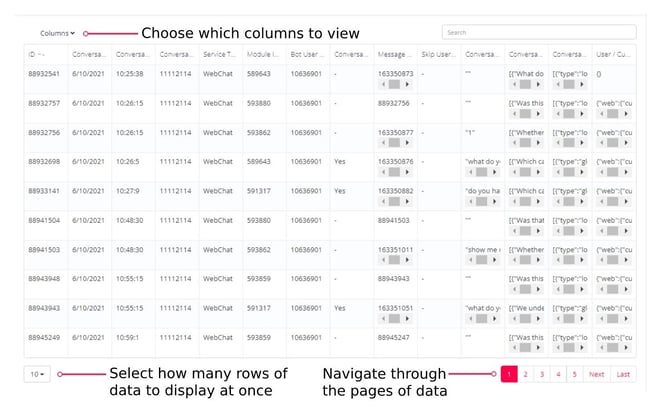
If you would like to view the data directly on the Message Reports landing page, mark the viewing option "Display On Screen" after filling in the Bot, Report Type, and From / To dates. Then click on the red button labeled "Display On Screen". A table will populate below where it says "RESULTS". As a reminder, this view is limited to a time interval of up to 15 days.
Keep in mind that you are able to customize this report. Simply press "Columns" to activate a drop-down menu where you'll see a list of the available data categories. Then you can select exactly what you want to view in your table.
Below, we'll explore the various Report Types and the column options available for each within the "Display On Screen" view:
- Display On Screen: Message Data
- Display On Screen: Standard
- Display On Screen: Advanced
- Display On Screen: Content Management
Display On Screen: Message Data
The Message Data Report Type includes (meta) data and details about every message sent and received by the bot. The following columns are automatically generated:
- ID: This value allows you to specify the row in the data where the user or a bot has taken a certain action.
- Conversation / Message date & time: These values allow you to see the date and time of the conversation.
- Conversation / Conversation ID: This represents the ID of an entire conversation. This allows you to focus on a particular conversation flow in the bot, and you can see how many Modules have appeared in a conversation.
- Service Type: This will show you which channel the conversation was conducted on (e.g., Zendesk or Messenger).
- Module ID: This identifies the specific Module to which input has been made. If you are unsure where to find the Module number, please refer to "How to edit a Module" for an illustration.
- Next Module ID: This is the ID of the next Module triggered, essentially the Module ID of the bot's response.
- Bot User ID: This is the ID we give to your bot users, which can be useful if you need to identify a user.
- Conversation / Global Connection: Here you will be able to see if a response was prompted by Global Connections. This provides insight as to how the user is guided through the chatbot.
- Message Evaluate ID: The ID of the specific connection being matched for that Module.
- Skip User Input: This will show whenever a Module had the "skip user input" function enabled.
- Conversation / User reply: Here you can see the user's input to the bot. It will show both which buttons the user has pressed (displayed as "Suggested Replies") and freely written text.
- Conversation / Bot response: This will show you the chatbot's answer to a user reply, but in a processed way. That means if you've used variations or the name of the user in the bot's reply Module, the data will be presented the same way as it is presented to the user.
- Conversation Data: All values retrieved and stored in variables through a Webhook.
- User / Custom variables: Here you will be able to see any Custom Variables you have used in your Modules up to that point in the conversation.
Display On Screen: Standard
The Standard Report Type gives an overview of the user's interaction with the bot and the flow of the conversation. The following columns are automatically generated:
- ID: This value allows you to specify the row in the data where the user or a bot has taken a certain action.
- Conversation / Message date & time: These values allow you to see the date and time of the conversation.
- Conversation / Conversation ID: This represents the ID of an entire conversation. This allows you to focus on a particular conversation flow in the bot, and you can see how many Modules have appeared in a conversation.
- Service Type: This will show you which channel the conversation was conducted on (e.g., Zendesk or Messenger).
- Module ID: This identifies the specific Module to which input has been made. If you are unsure where to find the Module number, please refer to "How to edit a Module" for an illustration.
- Next Module ID: This is the ID of the next Module triggered, essentially the Module ID of the bot's response.
- Conversation / Global Connection: Here you will be able to see if a response was prompted by Global Connections. This provides insight as to how the user is guided through the chatbot.
- Skip User Input: This will show whenever a Module had the "skip user input" function enabled.
- Conversation / User reply: Here you can see the user's input to the bot. It will show both which buttons the user has pressed (displayed as "Suggested Replies") and freely written text.
- Conversation / Bot response: This will show you the chatbot's answer to a user reply, but in a processed way. That means if you've used variations or the name of the user in the bot's reply Module, the data will be presented the same way as it is presented to the user.
- User / Custom variables: Here you will be able to see any Custom Variables you have used in your Modules up to that point in the conversation.
- Kpi Name: Here you will see any Tags that have been added to a Module, allowing you to quickly find when and where a particular Tag was triggered.
Display On Screen: Advanced
The Advanced Report Type provides the largest amount of information on conversation flow, message content, and bot label configuration. The following columns are automatically generated:
- ID: This value allows you to specify the row in the data where the user or a bot has taken a certain action.
- Conversation / Message date & time: These values allow you to see the date and time of the conversation.
- Conversation / Conversation ID: This represents the ID of an entire conversation. This allows you to focus on a particular conversation flow in the bot, and you can see how many Modules have appeared in a conversation.
- Service Type: This will show you which channel the conversation was conducted on (e.g., Zendesk or Messenger).
- Module ID: This identifies the specific Module to which input has been made. If you are unsure where to find the Module number, please refer to "How to edit a Module" for an illustration.
- Next Module ID: This is the ID of the next Module triggered, essentially the Module ID of the bot's response.
- Bot User ID: This is the ID we give to your bot users, which can be useful if you need to identify a user.
- Conversation / Global Connection: Here you will be able to see if a response was prompted by Global Connections. This provides insight as to how the user is guided through the chatbot.
- Skip User Input: This will show whenever a Module had the "skip user input" function enabled.
- Conversation / User reply: Here you can see the user's input to the bot. It will show both which buttons the user has pressed (displayed as "Suggested Replies") and freely written text.
- Conversation / Bot response: This will show you the chatbot's answer to a user reply, but in a processed way. That means if you've used variations or the name of the user in the bot's reply Module, the data will be presented the same way as it is presented to the user.
- Conversation Data: All values retrieved and stored in variables through a Webhook.
- User / Custom variables: Here you will be able to see any Custom Variables you have used in your Modules up to that point in the conversation.
- Group Name: If you have used the Groups tool, you can see data pertaining to the different paths.
- Kpi Name: Here you will see any Tags that have been added to a Module, allowing you to quickly find when and where a particular Tag was triggered.
Display On Screen: Content Management
The Content Management Report Type allows for detailed analysis of the bot's Module content. The following columns are automatically generated:
- ID: This value refers to the Module ID in the Certainly Platform. If you are unsure where to find the Module number, please refer to "How to edit a Module" for an illustration.
- Created Date: This shows you the date and time when the Module was created.
- Updated Date: This shows you the date and time when the Module was last updated.
- Conversation / Module Name: Here you see the name given to the Module.
- Conversation / Module Type: Here you can see what type of Module it is (statement, multiple choice, etc.).
- Conversation / Bot Message: This allows you to see the Module message that will be displayed to the user, which can be useful if you want to compare it with a user reply. This also contains pre-processed responses, so if you have used variations or included a user's name, then this will appear the same way that it does in the editor mode.
- Conversation / Bot Error Message: This allows you to see the bot error message that will be displayed to the user when the user's input does not meet the set requirements. This is helpful for checking how often and when any errors occur.
- Skip User Input: This will show whenever a Module had the "skip user input" function enabled.
- Kpi Name: Here you will see any Tags that have been added to a Module, allowing you to quickly find when and where a particular Tag was triggered.
- Meta Data: This is Module-specific data, such as the exact position of the Module on the bot canvas, the supported languages, or mapped variables.
Send By Email
If you prefer to access your data via a CSV file (or you wish to view data from more than 15 days), you will want to select "Send By Email". After you mark that viewing option and fill in the Bot, Report Type, and From / To dates, click on the red button labeled "Send By Email".
A pop-up message will inform you that the report will arrive shortly in your inbox and remind you which email address it has been sent to. Please check your spam folder if you do not see the report within a few minutes.
The email's subject line will include the name of your bot, the Report Type, and the time interval you have selected (e.g., Basic Support Bot_Content Management_27-09-2021_11-10-2021). The email will contain a link to download the report, as shown below. This link will only be functional for 24 hours, so if you want to access the same report again, you will need to repeat the "Send By Email" process.
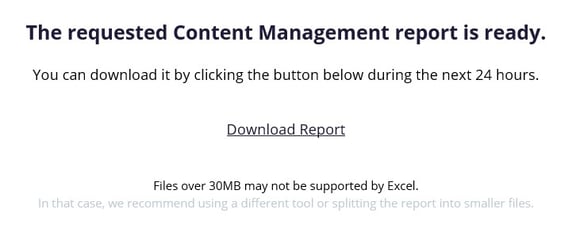
Excel does not support cells containing more than 32,767 characters. If you notice your cells lack information, it's likely Excel trimmed the cells upon opening the file.
In this case, please try opening the downloaded report with another tool.
Below, we'll explore the various Report Types and the column options available for each within the Send By Email view:
- Send By Email: Message Data
- Send By Email: Standard
- Send By Email: Advanced
- Send By Email: Content Management
Send By Email: Message Data
The Message Data Report Type includes (meta) data and details about every message sent and received by the bot. The following columns are automatically generated:
- id: This value allows you to specify the row in the data where the user or a bot has taken a certain action.
- timestamp: Here you can observe the date and time of the conversation.
- message: Here you can see the user's input to the bot. It will show both which buttons the user has pressed (displayed as "Suggested Replies") and freely written text.
- response: This will show you the chatbot's answer to a user reply, but in a processed way. That means if you've used variations or the name of the user in the bot's reply Module, the data will be presented the same way as it is presented to the user.
- conversation_id: This represents the ID of an entire conversation. This allows you to focus on a particular conversation flow in the bot, and you can see how many Modules have appeared in a conversation.
- bot_module_id: This identifies the specific Module to which input has been made. If you are unsure where to find the Module number, please refer to "How to edit a Module" for an illustration.
- external_agent: This value is an ID assigned by a third-party integration to an agent.
- is_global_module_match: Here you will be able to see if a response was prompted by Global Connections. This provides insight as to how the user is guided through the chatbot.
- id_message_evaluate: The ID of the specific connection being matched for that Module.
- data: All values retrieved and stored in variables through a Webhook.
- next_module_id: This is the ID of the next Module triggered, essentially the Module ID of the bot's response. If you are unsure where to find the Module number, please refer to "How to edit a Module" for an illustration.
- date: This value allows you to observe only the date of the conversation, which is helpful for simplifying the data analysis.
- time: This is the time at which the conversation ended.
- service_type: This will show you which channel the conversation was conducted on (e.g., Zendesk or Messenger).
- cvars: Here you will be able to see any Custom Variables you have used in your Modules up to that point in the conversation.
Send By Email: Standard
The Standard Report Type gives an overview of the user's interaction with the bot and the flow of the conversation. The following columns are automatically generated:
- id: This value allows you to specify the row in the data where the user or a bot has taken a certain action.
- message: Here you can see the user's input to the bot. It will show both which buttons the user has pressed (displayed as "Suggested Replies") and freely written text.
- response: This will show you the chatbot's answer to a user reply, but in a processed way. That means if you've used variations or the name of the user in the bot's reply Module, the data will be presented the same way as it is presented to the user.
- conversation_id: This represents the ID of an entire conversation. This allows you to focus on a particular conversation flow in the bot, and you can see how many Modules have appeared in a conversation.
- bot_module_id: This identifies the specific Module to which input has been made. If you are unsure where to find the Module number, please refer to "How to edit a Module" for an illustration.
- next_module_id: This is the ID of the next Module triggered, essentially the Module ID of the bot's response. If you are unsure where to find the Module number, please refer to "How to edit a Module" for an illustration.
- date: This value allows you to observe only the date of the conversation, which is helpful for simplifying the data analysis.
- time: This is the time at which the conversation ended.
- service_type: This will show you which channel the conversation was conducted on (e.g., Zendesk or Messenger).
- cvars: Here you will be able to see any Custom Variables you have used in your Modules up to that point in the conversation.
- kpi_label: Here you will see any Tags that have been added to a Module, allowing you to quickly find when and where a particular Tag was triggered.
Send By Email: Advanced
The Advanced Report Type provides the largest amount of information on conversation flow, message content, and bot label configuration. The following columns are automatically generated:
- id: This value allows you to specify the row in the data where the user or a bot has taken a certain action.
- date & time: These values allow you to observe the date and time of the conversation.
- message: Here you can see the user's input to the bot. It will show both which buttons the user has pressed (displayed as "Suggested Replies") and freely written text.
- response: This will show you the chatbot's answer to a user reply, but in a processed way. That means if you've used variations or the name of the user in the bot's reply Module, the data will be presented the same way as it is presented to the user.
- cvars: Here you will be able to see any Custom Variables you have used in your Modules up to that point in the conversation.
- conversation_id: This represents the ID of an entire conversation. This allows you to focus on a particular conversation flow in the bot, and you can see how many Modules have appeared in a conversation.
- bot_module_id: This identifies the specific Module to which input has been made. If you are unsure where to find the Module number, please refer to "How to edit a Module" for an illustration.
- next_module_id: This is the ID of the next Module triggered, essentially the Module ID of the bot's response. If you are unsure where to find the Module number, please refer to "How to edit a Module" for an illustration.
- skip_user_input: This will show whenever a Module had the "skip user input" function enabled.
- module_group_label: If you have used the Groups tool, you can see data pertaining to the different paths.
- is_global_module_match: Here you will be able to see if a response was prompted by Global Connections. This provides insight as to how the user is guided through the chatbot.
- data: All values retrieved and stored in variables through a Webhook.
- service_type: This will show you which channel the conversation was conducted on (e.g., Zendesk or Messenger).
- botuser_id: This is the ID we give to your bot users, which can be useful if you need to identify a user.
- kpi_label: Here you will see any Tags that have been added to a Module, allowing you to quickly find when and where a particular Tag was triggered.
Send By Email: Content Management
The Content Management Report Type allows for detailed analysis of the bot's Module content. The following columns are automatically generated:
- id: This value allows you to specify the row in the data where the user or a bot has taken a certain action.
- created_date: This shows you the date and time when the Module was created.
- updated_date: This shows you the date and time when the Module was last updated.
- name: Here you see the name given to the Module.
- type: Here you can see what type of Module it is (statement, multiple choice, etc.).
- instruction: This allows you to see the Module message that will be displayed to the user, which can be useful if you want to compare it with a user reply. This also contains pre-processed responses, so if you have used variations or included a user's name, then this will appear the same way that it does in the editor mode.
- error_instruction: This allows you to see the bot error message that will be displayed to the user when the user's input does not meet the set requirements. This is helpful for checking how often and when any errors occur.
- meta: This is Module-specific data, such as the exact position of the Module on the bot canvas, the supported languages, or mapped variables.
- group_label: If you have used the Groups tool, you can see data pertaining to the different paths.
- kpi_label: Here you will see any Tags that have been added to a Module, allowing you to quickly find when and where a particular Tag was triggered.