In this article, we'll explain how to store an end user's reply in a Custom Variable (CVar) from a Module's Connections tab. We'll also show how you can access this information in other Modules and set up specific flows based on end user replies.
If you're new to programming, it may help to think of variables as boxes where you can store data like a name, email address, or phone number. Each box (CVar) has a label (CVar name), which you can use to access its contents when needed.
It was possible to set a variable via a Module's Message tab, but this is now a legacy feature. Any existing CVars set in that tab at the time of deprecation will remain, but new CVars must be created in the Connections tab.
Below, we'll explore how to do the following:
- Store end user replies in Custom Variables using Statement Modules
- Store end user replies in Custom Variables using Collector Modules
- Access information saved in Custom Variables
- Use Custom Variables to set up flows based on end user replies
Store end user replies in Custom Variables using Statement Modules
First, let's look at how to collect and save an end user's reply in a CVar using a Statement Module.
For this example, we will store the name of the user. Because a name is just a string of text, it will also work with any other text, such as the description of a problem, a request for help, and so on.
Following these steps, you can create a Module that asks for the user's name and saves it in a CVar called user_name.
- Create a new Statement Module by right-clicking in an empty spot of the canvas and selecting "Statement". Open the newly created Module by double-clicking it or selecting "Edit module" in the hover menu, then enter a relevant name for the Module. In this example, we use "Collect user_name".
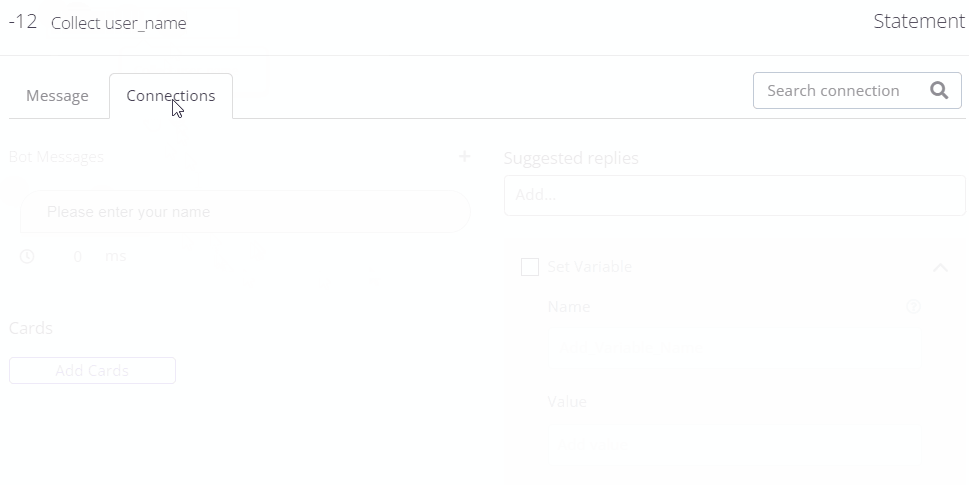
- Under Bot Messages in the Message tab, enter instructions for the user to provide their name. You can see steps 1-2 here:
- Navigate to the Connections tab, then select "Add Connection". Remove the "If" condition by selecting the trash can symbol inside the connection area.
- Open the "Go to" drop-down menu and change the connection type to "Set Variable". Where it says Add_Variable_Name, type "user_name". From the "Add value" drop-down menu, select "this module end-user reply".
Note that CVar names must start with a letter, and only alphanumeric and underscore (_) characters are allowed. Names are also case sensitive, so userName and UserName represent two different CVars. - Select "Ok", then save your changes via the Navigation bar. This ensures that the CVar you created will be available for selection in other Modules. Next, learn how to access the information you've saved in Custom Variables.
Store end user replies in Custom Variables using Collector Modules
Now we'll explain how to collect and save the end user reply in a CVar using Collector Modules, which allow you to validate the information provided by the user. For this example, we'll use the Email Collector Module.
Using this guide, you can create a Module that asks for the user's email address and saves it in a CVar called user_email.
- Create a new Email Collector Module by right-clicking in an empty spot of the bot-building canvas and selecting Collector > Email > Add Module.
Open the newly created Module by double-clicking it or selecting "Edit module" in the hover menu, then enter a relevant name for the Module. In this example, we use "Collect user_email". - Under Bot Messages on the left side of the Message tab, add instructions for the user to provide their email address. Then add a few Bot Error Messages, which will appear when the user's reply is not validated as an email address.
You can see an example of how this tab should appear in the following image: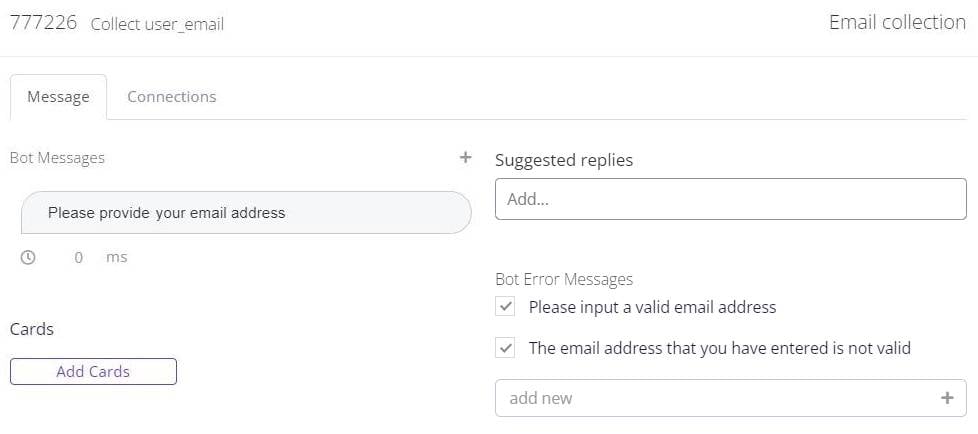
- Navigate to the Connections tab and select "Add Connection". Remove the "If" condition by selecting the trash can symbol inside the connection area.
- Open the "Go to" drop-down menu and change the connection type to "Set Variable". Where it says Add_Variable_Name, type "user_email". From the "Add value" drop-down menu, select "this module end-user reply".
You can see the Connections tab setup below: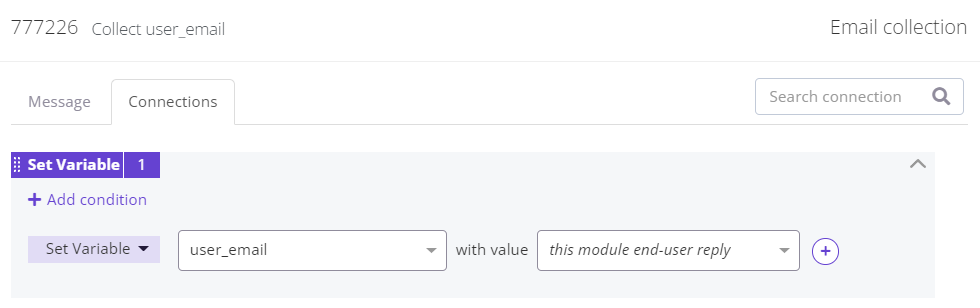
Note that CVar names must start with a letter, and only alphanumeric and underscore (_) characters are allowed. Names are also case sensitive, so userName and UserName represent two different CVars. - Select "Ok", then save your changes via the Navigation bar. This ensures that the CVar you created will be available for selection in other Modules. Next, learn how to access the information you've saved in Custom Variables.
Using other types of Collector Modules, you can validate and store even more input, such as numbers or URLs.
Access information saved in Custom Variables
Once you've stored an end user reply in a CVar, you can access that info for various purposes.
Here, we'll explain how to print the end user's name in the conversation after storing it in the user_name CVar, continuing with the first example in this article.
- Open the <md>Collect user_name Module by double-clicking it or selecting "Edit module" in the hover menu.
- In the Connections tab, select "Add Connection", then remove the "If" condition by selecting the trash can symbol inside the connection area.
- In the drop-down menu to the right of "Go to", select "Create New Module". Name this new Statement Module "Show user_name", then select "Create module".
- Select "Ok", then save your changes via the Navigation bar. You can view steps 2-4 below:

- Next, open the <md>Show user_name Module by double-clicking it or selecting "Edit module" in the hover menu.
- Under Bot Messages in the Message tab, type a note to the bot visitor that incorporates the name they provided. To pass the CVar, select Custom > Custom Variable > user_name.
Here, we thank the user for sharing their name: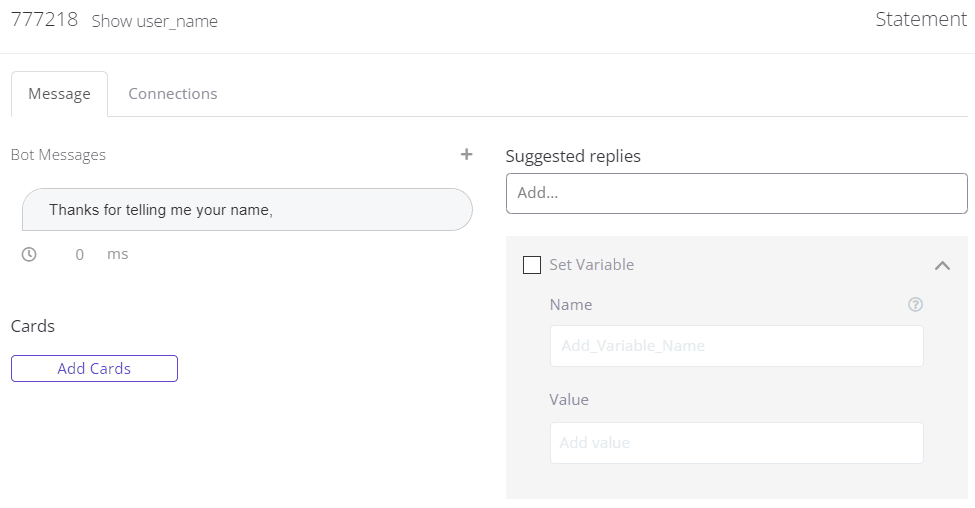
Remember to add a fallback message and any additional punctuation as needed.
- Select "Ok", then save your changes again. This example conversation appears as such:

As you can see, this allows you to add useful personalization.
In this case, the bot experience becomes more conversational, but you can also help a customer review their contact information, repeat back a user's message for a customer service agent before sending, or share other important details like order status. It's even possible to use CVars to render dynamic Suggested Replies by applying the List Filter.
These are just a few of the many possibilities!
Use Custom Variables to set up flows based on end user replies
Using CVars to tag users with certain values, you can structure flows based on end user responses.
For instance, consider a customer who has not accepted GDPR terms and conditions. Using CVars, we can direct that user onto a conversational path that asks them to accept the terms and conditions, or even exclude content if they decline.
In the following image, you can see the setup of this example flow, which we'll explore in greater detail below:

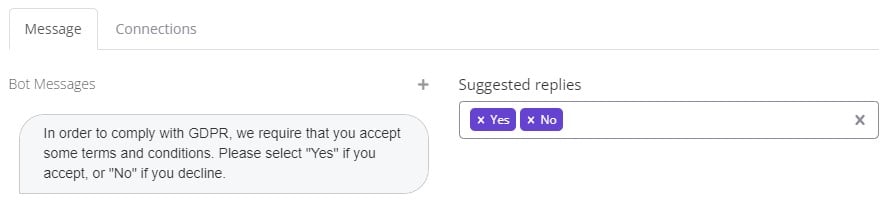
- In the Message tab of this flow's first Module, the bot asks the user to accept or decline the GDPR terms and conditions.
In the Connections tab of this same Module, we determine the path of the end user based on whether they accept the terms and conditions. The user is sent to the Module that corresponds with their reponse.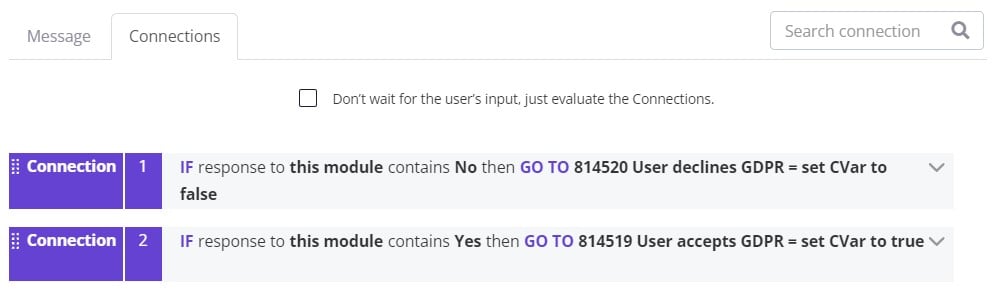
- In the Modules <md>User accepts GDPR = set CVar to true and <md>User declines GDPR = set CVar to false, we create a CVar named Accepted_GDPR. Instead of using the end user's reply, we hard-code the values "false" and "true".
You can see the Connections tab of the <md>User accepts GDPR = set CVar to true Module here: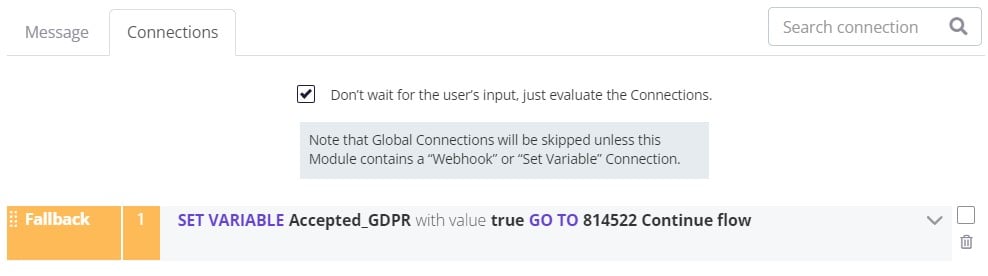
This allows us to tag end users based on whether they've accepted or declined the GDPR terms and conditions. - The <md>Continue flow Module, marked in purple, represents any flow you might have in a bot.
Here, it's only one Module, but it could theoretically be any number of Modules. The important thing to remember here is that everything preceding this Module (in this case, the Modules marked in teal) exists to assign a particular value to the end user.
In this case, we want to exclude content from end users who have not accepted the GDPR terms and conditions, which is why the Modules marked in red exist. With this setup, the user must accept the terms and conditions or be redirected to a part of the flow where their journey can no longer continue.
While we use GDPR in this example, the structure can be applied to any tag you wish to assign to an end user.