Want to make your bot smarter with AI? Great! We can help with that. There are two main steps to using AI in your bot: first, selecting the data you want to train your bot on, and second, establishing Connections based on that data.
To help you get started, we'll provide you with some background information and an overview of the AI Manager, which can be found in the right sidebar menu.
Below, we will address:
- Terms used in the AI Manager
- How to prepare for using the AI Manager
- How to use the AI Manager
- How to insert your Intents in Connections
Terms used in the AI Manager
First, we'll go over a few important terms. This is critical to gaining a solid understanding of our AI and using the AI Manager.
| Term | Definition |
| Domain | Domains are made up of Intents and can be considered the overall theme or subject for the area that could be covered. An example could be Shipping, as there are many different subcategories (Intents) that could fall within this Domain. |
| Intent | Intents express what your users want to do, and they function like the sub-categories of your Domains. Intents can be, for example, shipping price, shipping location, shipping time, or shipping tracking. |
| Example Sentence | Example Sentences can be thought of as the ways users might express an Intent. For instance: "How much do I have to pay for shipping?", "Do you provide free freight?", "What will we be charged for getting the goods delivered?", and "Tell me about your shipping prices." |
How to prepare for using the AI Manager
Before working in the AI Manager, it's important to have a clear picture of what you want to focus on. That's why conducting data analysis can be a valuable step, as you'll quickly get a sense of what topics and questions your users often bring up.
In this section, we'll explore:
Data analysis
The best way to get started is to analyze your pre-existing data. Traditional chat services such as Facebook Messenger, Zendesk, Service Now, LiveGuide, Dixa, and SnapEngage store logs of conversations.
If you already have a live bot, you can use data from the Message Insights Report.
By analyzing these logs, you will be able to see user tendencies. This information will allow you to determine a structure for your AI implementation. The logs are especially valuable if they are categorized by user intent. Logs from some chat services, such as Zendesk, often include such categorization.
Reviewing this “labeled data” can help you to decide what to focus on and improve the AI's initial performance. As part of this review process, we suggest doing the following:
- Conclude which Intents are most frequent and important.
- Decide how Intents should be separated.
- Determine which Intents can be answered automatically and which Intents require human takeover.
- Gain insights into which Domain-specific phrases are important for triggering certain Intents.
For Zendesk users, macros are often a good indicator of frequently used Intents that can be answered in a standardized manner. We recommend extracting statistics about the most frequently used shared macros.
Some customer support departments might also have libraries of personal macros. In some cases, tags are used to indicate the Intent of tickets. If tags are used consistently, they carry important information that can be used to classify the sentences.
Unsure how to export data? Reach out to us at support@certainly.io!
Defining Intents
From the data analysis, you can define your list of Intents. We recommend that you:
- try to find questions that the same Intent can cover;
- attempt to divide your Intents into what, where, why, and how questions to get a sense of the different query types;
- define between 10 and 100 Intents to get an overview of areas you should focus on (note that you must add at least two Intents, as we don't allow the AI to operate with fewer); and
- give your Intents short, easily interpretable names.
If you need more than 100 Intents, you should consider either merging some Intents together or narrowing the scope of what your chatbot addresses. For example, questions about if shipping is free or how much shipping costs should be covered by one Intent, as these both concern questions about shipping price.
You can also limit the use case for the bot. Your chatbot is not an actual human and should only cover a narrow topic. It might be preferable to create multiple chatbots for different Domains, or you could leave out some Intents entirely.
Defining a good set of Intents is important for the AI engine, and we recommend that you review your chosen list of Intents a few times before moving on to the next step.
Writing Example Sentences
Once you've decided on a list of Intents, you should provide the bot with no fewer than 30 Example Sentences for each Intent. It is important to use as much language variation as possible when providing the bot with Example Sentences.
For instance, the terms "Getting the goods delivered", "freight", and "shipping" are all different ways of saying the same thing. By covering all of the different possible expressions, the AI engine will perform much better.
How to use the AI Manager
Now that you have all of your data prepared, you can start working in the AI Manager. When you first open this tool, you will go through a short tutorial. Then you will be asked to choose which language you want to use your bot in.
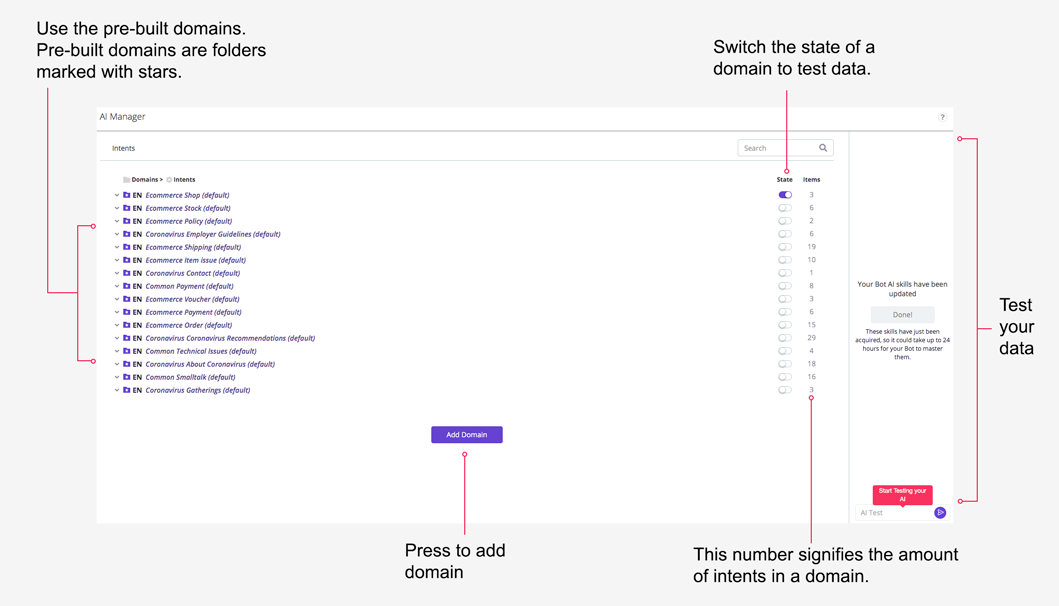
After selecting this, you will be taken to the AI Manager:
Below, we'll cover:
- Using public Domains
- Adding a Domain
- Updating Domains
- Creating Intents
- Creating Example Sentences
- Activating your AI data and training your bot
- Testing your AI data
Select the question mark in the upper right corner to revisit the AI Manager tutorial.
Using public Domains
In the AI Manager, you'll notice there are already quite a few folders with stars in this view. These are public Domains.
Remember, a Domain is made up of Intents, and it should represent the overall theme of those Intents. The public Domains have been created by Certainly and contain prebuilt Intents and Example Sentences that can be used as a foundation for your work. We recommend using the public Domains and Intents as much as possible, so you don’t have to start from scratch.
You can always add new Intents to the prebuilt Domains. Similarly, you can add Example Sentences on top of these Intents. All you have to do is hover your mouse to the left of an existing Intent or Example Sentence, and the option to add a new Intent or Example Sentence will appear. There is more information on this below.
Adding a Domain
To add a Domain, select “Add Domain" at the bottom of the AI Manager.
Any Domains you add within your company will be available to all your authorized users, and these Domains will appear in the AI Manager for all your company's bots.
You'll then select a language for your Domain at the top left of the next screen. Press the box that says, “Start from scratch”. A new folder will be added to the list of Domains in your AI Manager. This is your new Domain. You can name that folder by double-clicking on the text. Please remember to create easily identifiable names for your Domains.
You can also use the "Import Domains" function. When you select this option, it will provide information and a visual example of how to format your data in a .xlsx / .xls file in order to upload it to the AI Manager. After clicking "Import", these Domains will appear on the overview screen.
To add one of these imported Domains to your bot, simply click on the Domain. It will then be available in the folders view of the AI Manager:
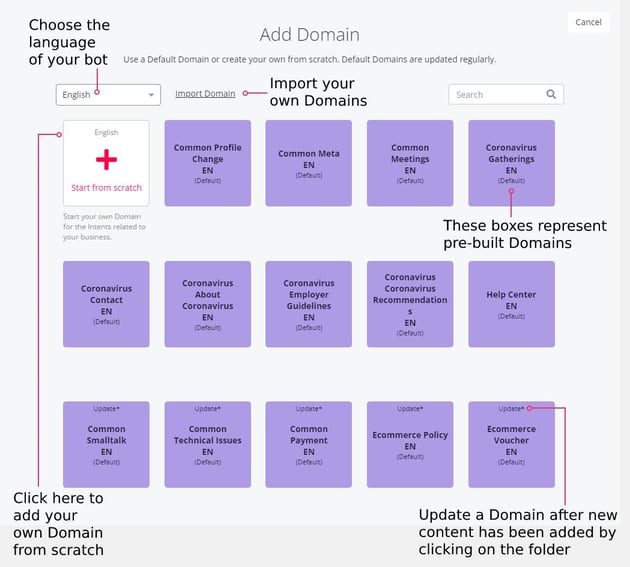
Updating Domains
If new content has been added to a Domain, you'll see "Update*" at the top of that Domain folder in the AI Manager. This is the case for updates made both by your own organization and by Certainly offering new prebuilt Domains or adding content to existing ones. To include the new content in the AI of your bot, just click on the Domain. The latest content will be added.
This works across bots as well. For example, if you are using the same Domain in two bots, and you add new content to that Domain in Bot A, you can easily include that content in Bot B with just one click in Bot B's AI Manager.
Creating Intents
After you've created a Domain, it will be possible to add Intents to the Domain.
You must add at least two Intents for the AI to work. If you hover your mouse over the Domain folder, you'll see a small plus sign. Select this and an Intent will be added.
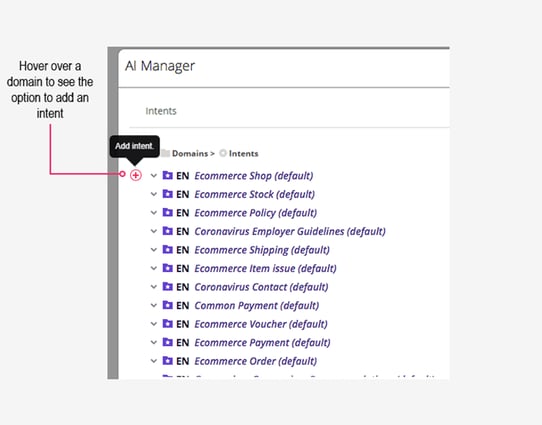
You can name and rename these Intents as you wish.
Creating Example Sentences
Under each Intent, you'll have to add a number of Example Sentences. To do so, hover over an Intent and a small plus sign will appear. Select this then insert your Example Sentence.
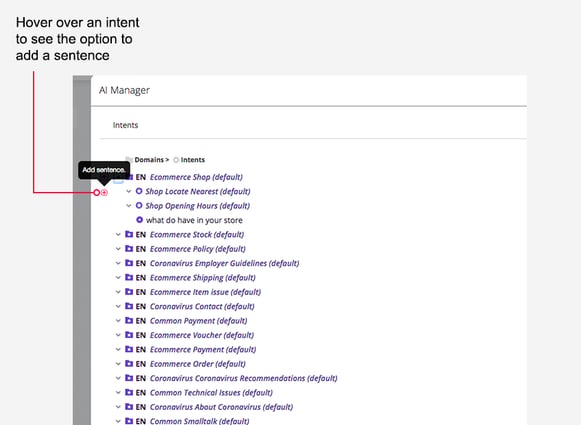
We recommend aiming for at least 30 Example Sentences per Intent.
Activating your AI data and training your bot
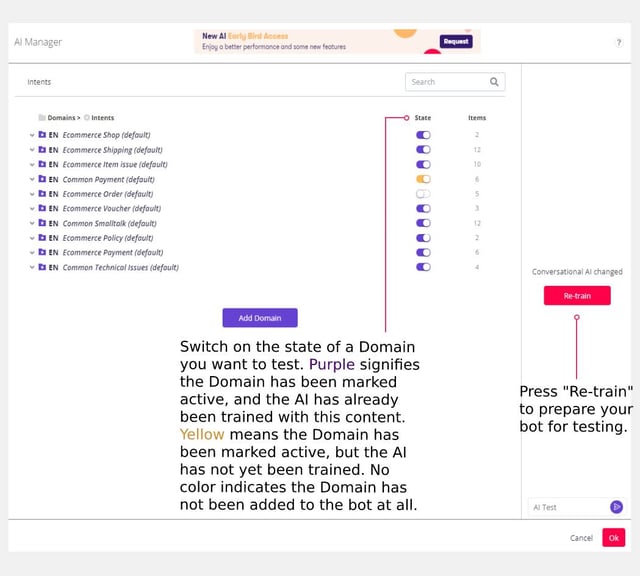
To activate your data, you must use the toggle button under the "State" column.
Toggling the state of a Domain from "inactive" to "active" will enable all Intents within that Domain. If you only wish to activate certain Intents within a Domain, individually toggle the state of each desired Intent instead.
To improve the AI performance, ensure any Intents you've enabled are used in Connections. If they are not, simply toggle the state back to "inactive" in the AI Manager and retrain.
After activating your AI data, select "Retrain" to train your bot with the activated content. When a Domain has already been trained, its state is marked in purple, and if it has not been trained yet, its state is marked in yellow.
Testing your AI data
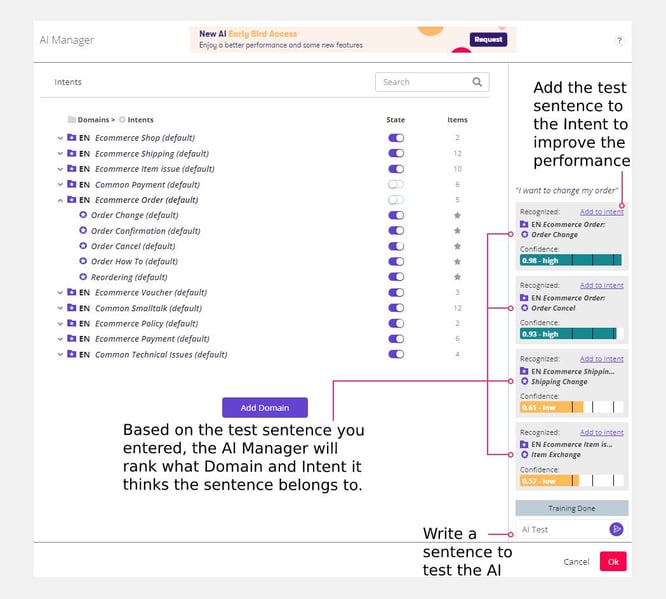
Once you've activated your AI data and trained your bot, you're now ready to start testing!
On the right side of the AI Manager, you'll see a test area. Please see below for a visual representation of the AI testing process:
The test area will appear inactive if you haven’t activated your AI data and retrained.
Here, we'll address how to:
Conduct your tests
We recommend that you run 10 independent tests with 10 colleagues who have not been involved in the bot's development. Ask them to write a sentence that has something to do with your activated Domains and Intents.
The AI Manager will then display your test results. These results calculate the likelihood of the question being an expression of your activated Intents.
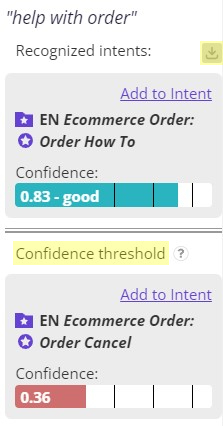
Access the test results
The test results will appear below the provided test sentence. The results are divided by a confidence threshold. Results below 0.5 won't trigger any Connections, but this information can help you improve your AI.
The raw data can be downloaded as a .txt file using the button above the results list.
You can see the download button and threshold divider highlighted in the following image:
Use the test results to improve AI performance
For each test, pay attention to if:
- there are any Intents that you've failed to cover with your initial Intent definitions, and/or
- there are any user expressions that the bot fails to recognize.
When your initial tests are over, add any missing Intents and Example Sentences to your data, then retrain your bot. If you find the performance of the AI system unsatisfactory, repeat this step until you reach the desired result.
For complex use cases, the AI system might require hundreds of Example Sentences for each Intent to perform satisfactorily. Remember that the more (and more specific) data you can provide your bot, the better!
How to insert your Intents in Connections
To be able to use your work from the AI Manager, you'll have to insert the Intents into Connections. The Intents can be inserted in both local Module Connections and Global Connections.
Before inserting an Intent, you must activate its state and retrain your bot.
Below, you can see an overview of the process:
We'll explain how to:
- Set up the "AI understands" Condition
- Determine the confidence level
- Choose an action of the Connection
Set up the "AI understands" Condition
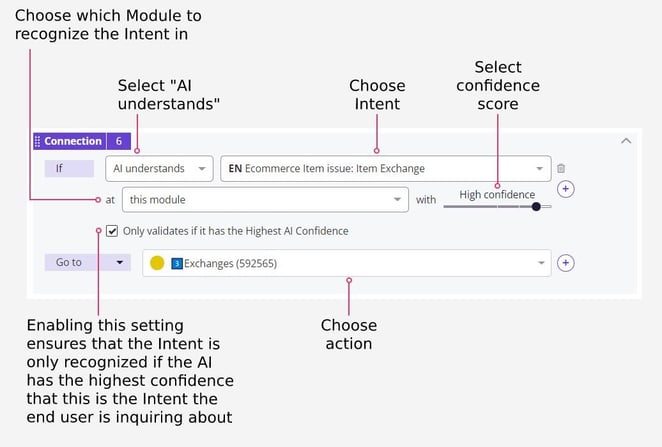
To add an Intent in a Connection, first, select the “AI understands” Condition. In the drop-down list to the right, you can access a list of the Intents activated in your bot. Select one of these Intents, then choose which Module to recognize the Intent in.
Determine the confidence level
Next, choose a confidence level of the Intent's recognition. This should be based on the number of sentences you've added to the Intent and also the results you've gotten from training your bot.
You also have the option of enabling the "Only validates if it has the Highest AI Confidence" function to ensure that the Intent is only recognized if the AI has the highest confidence that this is the correct Intent. That is, if the AI has higher confidence that another Intent than the one selected is the right one, then it will not match the Connection at all.
You'll want to ensure that the Intents you've enabled are being used in Connections. This improves the AI performance and ensures Connections are met as expected.
For instance, consider that Intents A and B are enabled and Intent A matches higher than Intent B. If the top Intent (A) is not being used in a Connection, it can stop the Connection from being met.
Choose an action of the Connection
Finally, select the action that will occur when the "AI understands" Condition is met: whether the conversation will proceed to another Module, a Webhook will be executed, or a Custom Variable will be set.