This article will focus on connecting your Certainly bot to your Zendesk Messaging account.
Zendesk Messaging will allow your Certainly bot to communicate with your customers not only via its native Web Widget but also via popular social messaging (Facebook, X, WhatsApp, etc.). You can learn more in the Welcome to Messaging.
Below, we'll walk you through the following:
- Connecting your bot to Zendesk Messaging
- Validating that Certainly is Connected to Zendesk Messaging
- Embedding the Zendesk Messaging widget
- Enabling Human Agent Takeover
- Return control to you Certainly bot
- Uninstall the bot
An Admin account in Zendesk is required to complete the integration.
Connecting your bot to Zendesk Messaging
- Once on the Certainly Platform, open up the bot you wish to connect to Zendesk Messaging, then navigate to Bot Settings > Channels. In the Zendesk Messaging & Sunshine Conversations section, click on "Install". It is highly recommended to be logged in to your Zendesk account before.
- You’ll then be asked to enter your Zendesk subdomain, select "Sign in" and enter the credentials of your Zendesk bot account when prompted
- Grant the Certainly app permission to access your Zendesk
- See the whole Installation process in this GIF:

- Next, you should go to the Zendesk Admin Center
AI > AI agents > Marketplace bots
The Certainly bot should appear there, like in the following screenshot:
- Click "Set as default for all channels", which will create a new switchboard integration for the Certainly bot and will make it active. It will also configure Agent Workspace as the default next switchboard integration. That means that when you pass control to a human agent, you can use
"passControl": "next"without specifying the integration name or ID, and be sure that the control will go to Agent Workspace. - Once connected, you can configure which channels the Certainly bot should serve by clicking on the "Certainly by Cegeka"
Validating that Certainly is Connected to Zendesk Messaging
- Head over to your Messaging settings within your Zendesk Admin Center. If you have not done it already, configure a Web Widget channel.
- Open your Web Widget Channel settings, and confirm that Certainly is set to be the first line of response under the "Response" tab.
- Click on "Test it now" to open a preview of the Messaging Web Widget. Your Certainly bot should successfully pick up conversations:

You've now integrated your Certainly bot with Zendesk Messaging. Congrats!
Embedding the Zendesk Messaging widget
- To add the Zendesk Messaging widget to your site, first navigate to the "Messaging" section, under Channels, in the left-hand menu for your Zendesk Admin Center:

- Click on the "Add Channel" and create a Web Widget Channel:

- Paste the code snippet from the Installation section to your website, just before the closing </body> tag.
Enabling Human Agent Takeover
Your bot is now handling all of the incoming chats in any of the channels you have enabled in your Zendesk Messaging settings. This section shows how to pass control of a conversation to your Zendesk agents.
To accomplish this, you will need to create an instance of Sunshine Conversations Pass Control Webhook. It is ready to use immediately without any configuration; however, if customization is required, detailed instructions are available in the Webhook description.
When passing ticket field data to Zendesk, make sure to avoid using empty variables. Apply the default('') Jinja filter, as shown in the example above, to prevent any issues with the webhook. Failure to do so may result in the conversation not being transferred to a human agent.
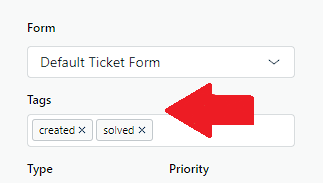
One example is being able to pass a string of comma-separated tags, like in the below image:
{
  "switchboardIntegration": "zd-agentWorkspace",
    "metadata": {
       "dataCapture.systemField.tags": "created,solved",
       "dataCapture.ticketField.900009347206": "{{ order_number|default('') }}",
  }
}
When the Webhook is fired, it will add tags to your tickets:
Passing the full chat history with the bot
By default, Zendesk passes the last 10 messages from the chatbot when creating a conversation ticket. To have a full chat history, you need to specify from what message you want it. It is easily achieved in 2 steps:
First, you need to record the message ID of the first message in a module that receives the first user's message (usually the Menu module) having a connection like this:
Here is Jinja's code for this
{{ sc.conversation.last_message.id }}
Then you need to add the first_message_id field under metadata in the handover Webhook like the following:
{
  "switchboardIntegration": "zd-agentWorkspace",
  "metadata": {
     "dataCapture.systemField.tags": "created,solved",
     "first_message_id": "{{ first_message_id|default('') }}",
     "dataCapture.systemField.requester.name":  "{{ visitor_name |trim |safe }}",
     "dataCapture.systemField.requester.email": "{{ visitor_email |trim |safe }}"
  }
}
Once you've saved your Webhook, you can now insert it into your handover flow in the bot canvas.
Insert Webhook into handover flow
The below image shows a simple flow you can implement when a user requests human support.

1) The first module collects the user's email.
2) The second module collects the user's name and executes the Pass Control webhook created earlier.

3) The third module asks the user to wait until a human agent joins the conversation. It waits for the user input ("Don’t wait for the user’s input" is unchecked)
Save and publish, and your bot will now be able to hand over to a human agent in Zendesk Support!
Return control to your Certainly bot
Bot Takeover is when your human agent wants to give a conversation back to your chatbot.
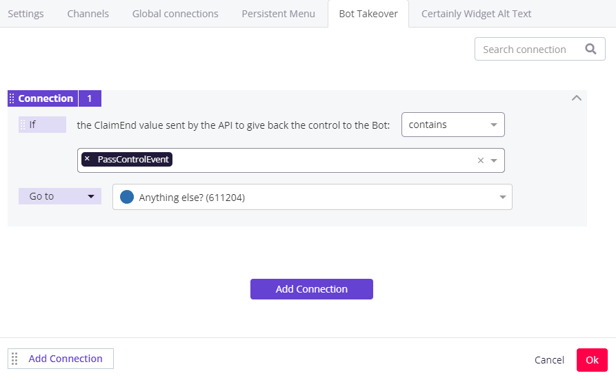
For a bot to take over the conversation from your human agent, you will need to create a connection in the Bot Takeover section which is found in Bot Settings, located in the right sidebar menu.
Go to “Bot Takeover”. Here you will have to add a connection that exactly matches with PassControlEvent and defines the destination Module in "Go to". Be aware that PassControlEvent is case-sensitive.
Please see the image below as a reference:
Once you have the connection set up, click Save & Publish. For your Zendesk agents to successfully hand over a conversation back to the bot, they'll have to enter the following string in the messaging field:
Zendesk Agent Workspace will pass control back to the Certainly bot (releaseControl ) automatically when a ticket is "Closed". Never use releaseControl/passControl shorthand within Agent Workspace Macros, Triggers, etc.
Agent Workspace has a default Automation to move tickets from "Solved" -> "Closed" (4 days later) You can customize the timing for closing tickets to suit your needs, whether that means setting it to close immediately, after one hour, or any other duration you prefer. Adjust the "close solved tickets" delay accordingly to reflect your chosen timeframe.
Uninstall the bot from Zendesk
To completely remove the Certainly bot, go to Zendesk Admin CenterChannels > AI > AI agents > Marketplace bots and click the 3 dots button and select "Uninstall"

This will result in:
- Removing Certainly bot's switchboard integration
- Activation of the Answer Bot switchboard integration
- Configuration of the Answer Bot's next switchboard integration to point to Agent Workspace
Each time you make updates to the bot, be sure to publish your changes to ensure they are reflected in the live environment.