In this article, you'll learn how to set up the Certainly chat integration with Kustomer.
You can deploy this integration on any website you own if it allows third-party scripts.
We'll explore how to:
Integrate with Kustomer Email Support
Once complete, this integration will allow your chatbot to create an email conversation on behalf of the visitor as a ticket in the Kustomer platform. This way, your Certainly bot will always act as your first level of support, while your human agents only intervene via email when needed.
Check out a video of the solution:
Configure a handover to Kustomer Email Support
Now we'll explain how to set up and test the handover.
- On Kustomer, create a new Team with Administrator permissions and add your agents. Read more about how to create, manage, and use Teams in Kustomer's documentation. This team will be used by Certainly when forwarding tickets to your support agents.
- Generate an API Key for the support team. This API Key will be used to authenticate Certainly Webhook requests to your Kustomer account. Learn more about how to manage Kustomer API Keys.
- Next, you'll need to configure your bot on the Certainly Platform. Following the steps below, your bot will be ready to create email conversations when the end user needs it.
- Save and publish your Certainly bot using the appropriate buttons in the Navigation bar at the top of your bot canvas:

- Create an Instance of the
 Kustomer Get Customer by Email Webhook Template.
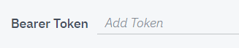
- Fill in the Authentication's Bearer Token with your Kustomer API Key.
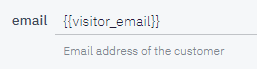
- Fill in the Context's “email” field with the email Custom Variable your visitors will input within your bot's conversation, such as “{{visitor_email}}”.
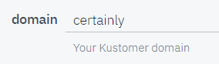
- Fill in the Context's “domain” field with the correct domain from your Kustomer account environment. In the example below, the domain is “certainly”.

- Fill in the Authentication's Bearer Token with your Kustomer API Key.
- Create an Instance of the Kustomer Create User Webhook Template.
- Fill in the Authentication's Bearer Token with your Kustomer API Key.
- Fill in the Context's “domain” field with the correct domain from your Kustomer account environment. In the example below, the domain is “certainly”.
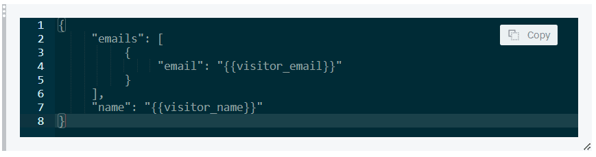
- Fill in the Body's “email” and “name” fields with the email and name Custom Variables your visitors will input within your bot's conversation, such as “{{visitor_email}}” and “{{visitor_name}}”.
- Fill in the Authentication's Bearer Token with your Kustomer API Key.
- Create an Instance of the Kustomer Create Conversation Webhook Template.
- Fill in the Authentication's Bearer Token with your Kustomer API Key.
- Fill in the Context's “domain” field with the correct domain from your Kustomer account environment. In the example below, the domain is “certainly”.
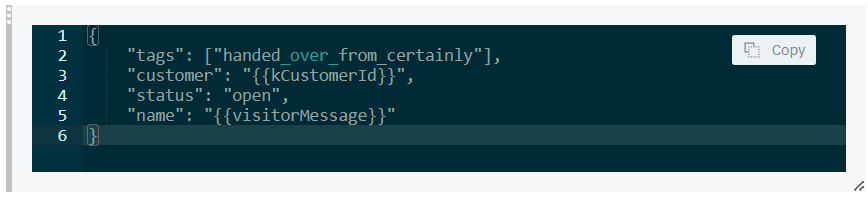
- Fill in the Body's “tags” field with the text tag you'd like to use on your visitor's requests, such as “handed_over_from_certainly”. Fill in the “customer” field with the customer ID Custom Variable obtained from the Webhook execution in Steps 5 and 6 (“{{kCustomerId}}”). Fill in the “name” field with the message subject your visitors will input within your bot's conversation, such as “{{visitorMessage}}”.
- Fill in the Authentication's Bearer Token with your Kustomer API Key.
- Create an Instance of the Kustomer Create Note Within Conversation Webhook Template.
- Fill in the Authentication's Bearer Token with your Kustomer API Key.
- Fill in the Context's “domain” field with the correct domain from your Kustomer account environment. In the example below, the domain is “certainly”.
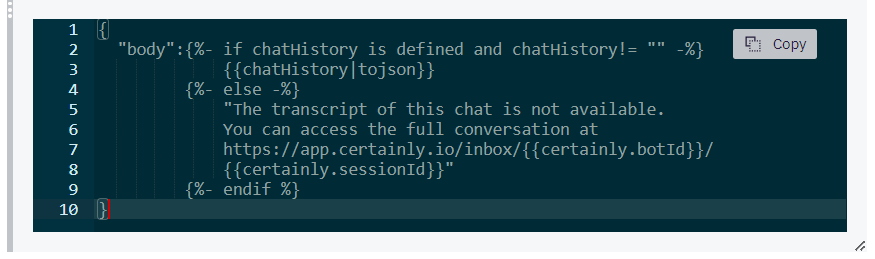
- Fill in the Body's “chatHistory” field with the chat history Custom Variable you will use within your bot, such as “{{chatHistory}}”.
- Fill in the Authentication's Bearer Token with your Kustomer API Key.
- Create an Instance of the Kustomer Create Message Webhook Template.
- Fill in the Authentication's Bearer Token with your Kustomer API Key.
- Fill in the Context's “domain” field with the correct domain from your Kustomer account environment. In the example below, the domain is “certainly”.
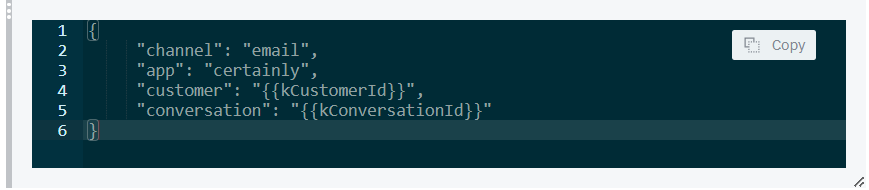
- Fill in the Body's “customer” field with the customer ID Custom Variable obtained from the Webhook execution in Steps 5 and 6 (“{{kCustomerId}}”). Fill in the “conversation” field with the conversation ID Custom Variable obtained from the Webhook execution in Step 8 (“{{kConversationId}}”).
- Fill in the Authentication's Bearer Token with your Kustomer API Key.
- Create an Instance of the Kustomer Check Agent Availability Webhook Template.
- Fill in the Authentication's Bearer Token with your Kustomer API Key.
- Fill in the Context's “domain” field with the correct domain from your Kustomer account environment. In the example below, the domain is “certainly”.
- Fill in the Authentication's Bearer Token with your Kustomer API Key.
- Create an Instance of the Certainly Get Conversation History Webhook Template.
- Return to your chatbot canvas and refresh the page. Otherwise, you won't be able to see the newly created Webhooks.
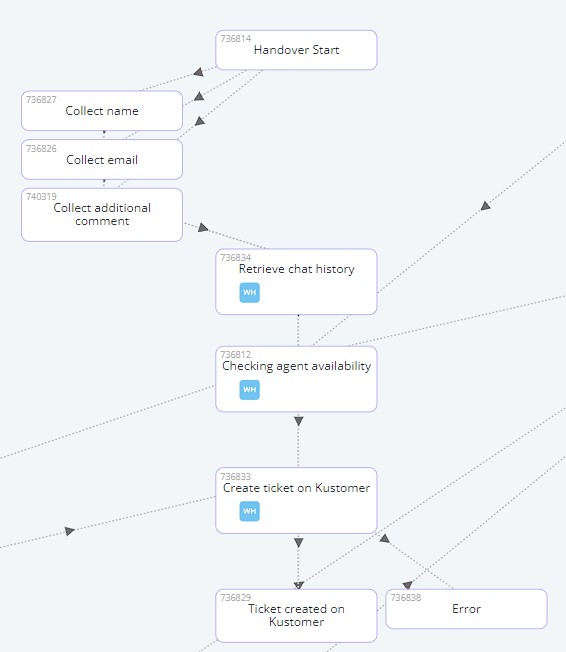
- Inside the Retrieve chat history Module, insert your Webhook instance Certainly Get Conversation History. It should look like this:
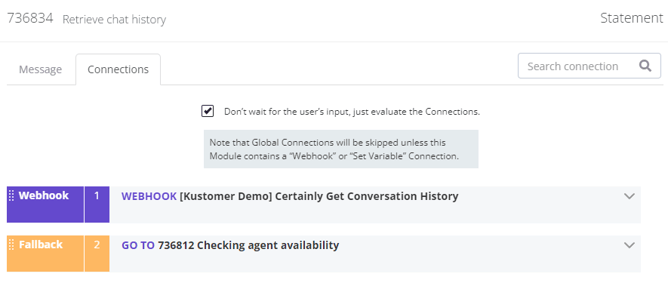
- Inside the Checking agent availability Module, insert your Webhook instance Kustomer Check Agent Availability, which checks if there are agents available.
Using the setup shown below, if there is an agent available, the bot will follow the "Agents available" flow. If there are no agents available, the bot will follow the "No available agents" flow.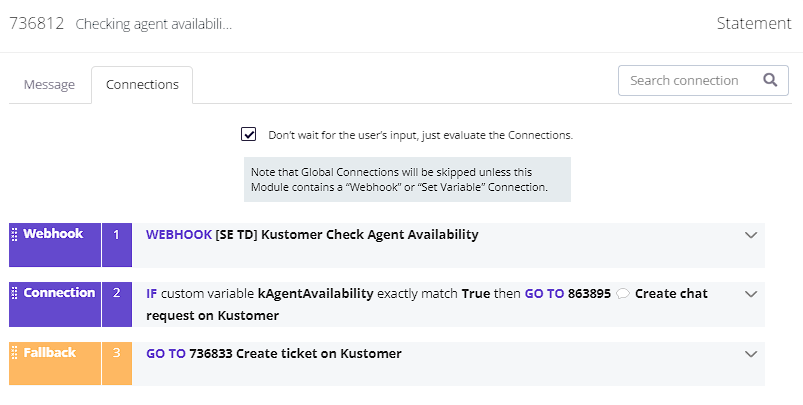
- Inside the Create Ticket on Kustomer Module, create the following Connections:
15A. Insert your Webhook instanceKustomer Get customer by email, which checks if a customer's email already exists. Using the setup shown below, if a customer does not already exist, it will create a new customer.
15B. Insert your Webhook instanceKustomer Create user.
15C. Insert your Webhook instanceKustomer conversation.
15D. Insert your Webhook instanceKustomer Create note within conversation.
15E. Insert your Webhook instanceKustomer message, which checks if the ticket creation throws an error.
Using the setup shown below, if there is an error, the bot will follow the "Error" flow. If the ticket was created successfully, the bot will follow the "Ticket created on Kustomer" flow.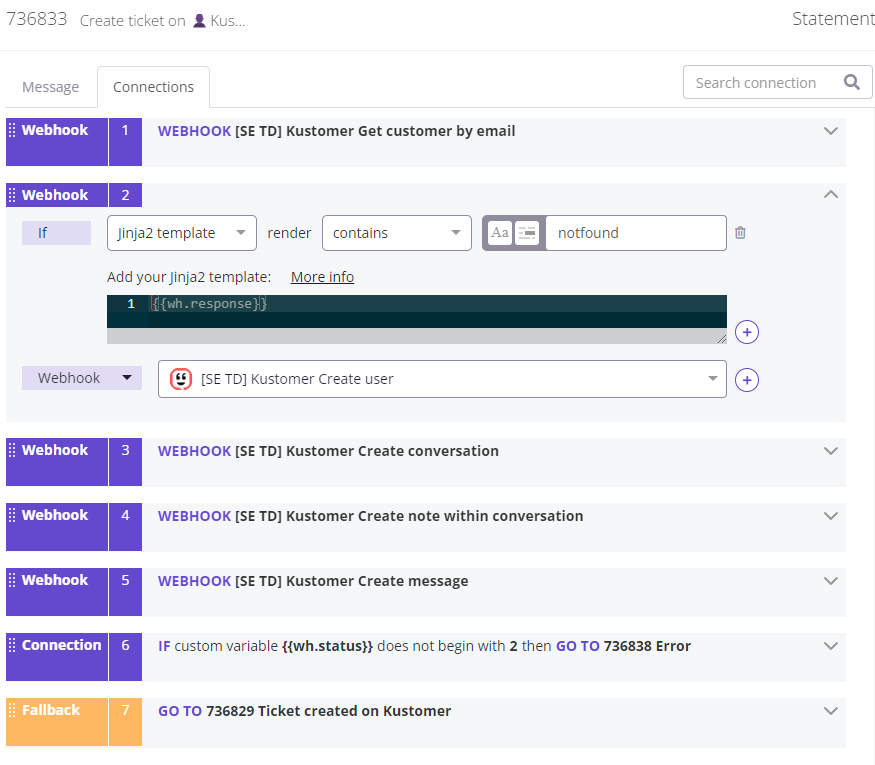
- Save and publish your Certainly bot using the appropriate buttons in the Navigation bar at the top of your bot canvas:
Once setup is complete, try running a test to ensure everything works properly.
Integrate with Kustomer Live Chat
This integration allows your Certainly chatbot to seamlessly hand over a live conversation to Kustomer. Your agents can pick up the conversation from the Kustomer platform and chat in real time with the visitor to solve any request.
Check out a video of the solution below:
Below, we'll explain how to set up the handover and deploy the integration on your website:
Configure a handover to Kustomer Live Chat
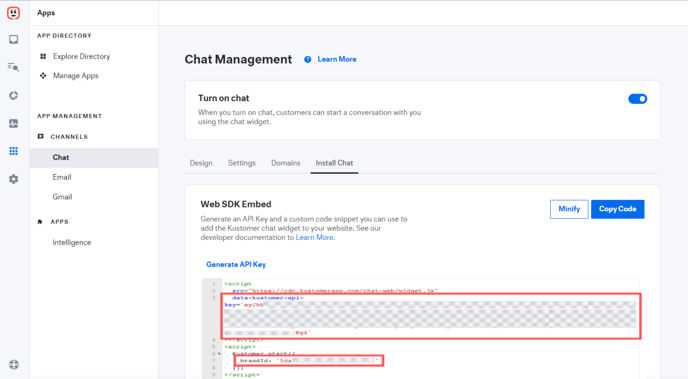
- Activate Kustomer's chat to integrate it with Certainly and make a copy of your brandId and data-kustomer-api-key, as indicated below. Read more about how to activate Kustomer Chat in their documentation.
- Next, you'll need to configure your bot on the Certainly Platform. Following the steps below, your chatbot will be ready to create, update, and end live chat conversations when the end user needs it.
- Save and publish your Certainly bot using the appropriate buttons in the Navigation bar at the top of your bot canvas:
- If you haven't done so before, create an Instance of the Kustomer Check Agent Availability Webhook Template.
- Fill in the Authentication's Bearer Token with your Kustomer API Key.
- Fill in the Context's “domain” field with the correct domain from your Kustomer account environment. In the example below, the domain is “certainly”.
- Fill in the Authentication's Bearer Token with your Kustomer API Key.
- If you haven't done so before, create an Instance of the Certainly Get Conversation History Webhook Template.
- Return to your chatbot canvas and refresh the page. Otherwise, you won't be able to see the newly created Webhooks.
- Inside the Retrieve chat history Module, insert your Webhook instance Certainly Get Conversation History. It should look like this:

- Inside the Checking agent availability Module, insert your Webhook instance Kustomer Check Agent Availability, which checks if there are agents available.
Using the setup shown below, if there is an agent available, the bot will follow the "Agents available" flow. If there are no agents available, the bot will follow the "No available agents" flow.
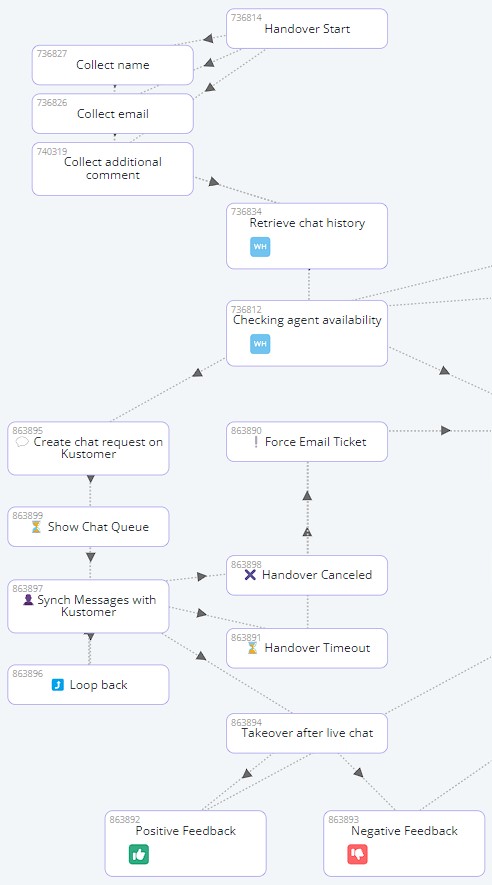
- Inside the Create Chat request on Kustomer Module, configure a trigger for the handover as follows:
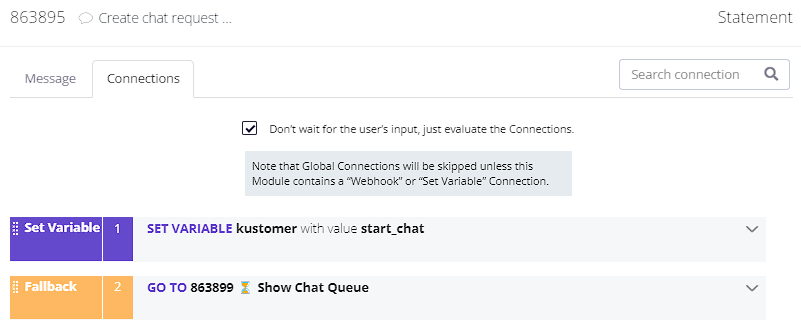
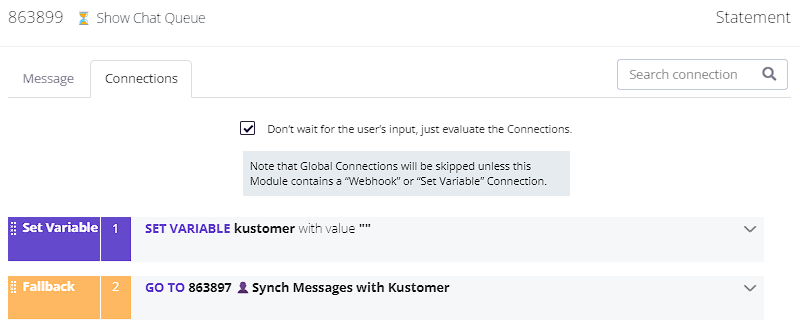
With this setup, as soon as the bot lands on the next Module, the handover to Kustomer Chat will be executed, providing the end-user a queue popup. - Inside the ⏳ Show Chat Queue Module, configure its Connections and Custom Variables as follows:
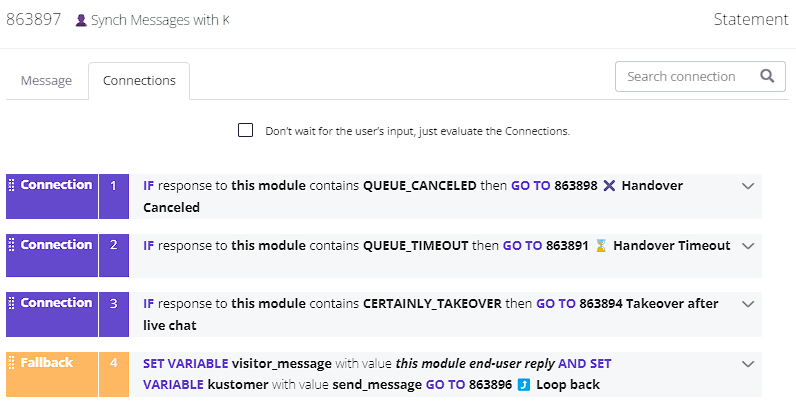
- Inside the 👤Synch Messages with Kustomer Module, configure its Connections and Custom Variable as follows:
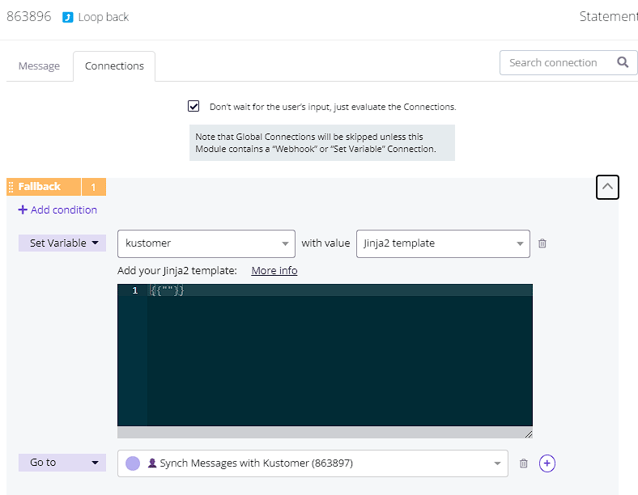
12. Inside the ⤴️ Loop back Module, configure its Connections and Custom Variable as follows:
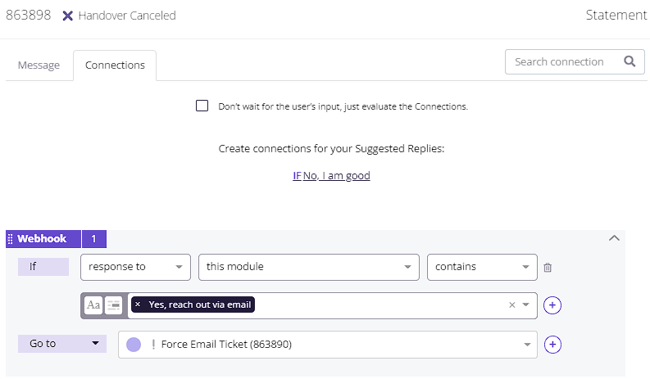
13. Inside the ✖️ Handover Canceled Module, configure its Connections and Custom Variable as follows:
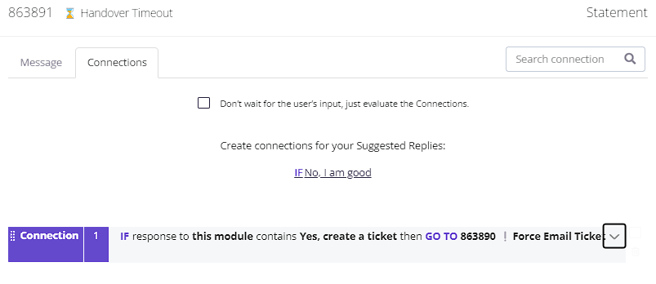
14. Inside the ⌛ Handover Timeout Module, configure its Connections and Custom Variable as follows:
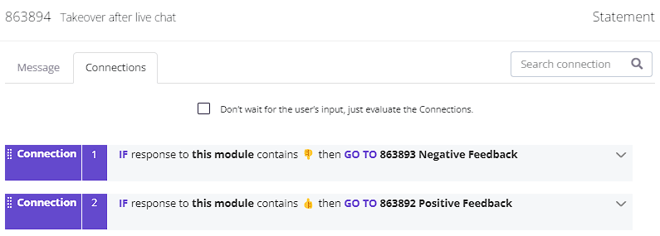
15. Inside the Takeover after live chat Module, configure its Connections and Custom Variable as follows:
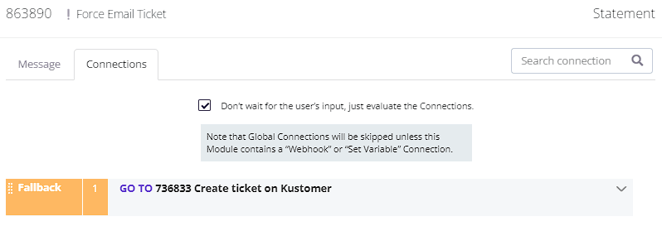
16. Inside the ❕Force Email Ticket Module, configure its Connections and Custom Variable as follows:
Deploy a Kustomer Live Chat integration on your website
Finally, you'll need to deploy both Kustomer Chat and Certainly on your website.
Embed the snippet below into your website, replacing the Kustomer Chat script and the Certainly bot ID with your own:
<!DOCTYPE html>
<html>
<body>
<!--Kustomer Core Widget Start-->
<script src="https://cdn.kustomerapp.com/chat-web/core.js"
data-kustomer-api-key='ADD_HERE_KUSTOMER_API_KEY'></script>
<script>
     const kustomer_brand_id = 'ADD_HERE_KUSTOMER_BRAND_ID'
</script>
<!--Kustomer Core Widget End-->

<!--Certainly Widget Start-->
<script src="https://app.certainly.io/sdk/webchat.js"></script>
<script>
     var certainly_settings = {
          id: "ADD_HERE_CERTAINLY_BOT_ID",
          mode: "clear_past_conversations",
          inputType: "bottom",
          cvars: {
               // Metadata can be passed to the bot
               // visitor_name: "John",
               // visitor_email: "jd@email.com"
          },
          kustomer_events: {
               takeover_module: "ADD_HERE_CHAT_ENDED_ON_KUSTOMER_MODULE_ID",
               agent_joined_message: "An agent has joined the conversation",
               bot_joined_message: "Bot has joined the conversation",
               agent_left_message: "An agent has left the conversation",
               bot_left_message: "Bot has left the conversation"
          }
     }
     initCertainlyWidget(certainly_settings);
</script>
<!--Certainly Widget End-->

<!--Kustomer extension for Certainly-->
<script src="https://scripts.certainly.io/extensions/kustomer/kustomer.js"></script>
<!--Kustomer extension for Certainly-->
</body>
</html>
Great work - now your bot is fully integrated with Kustomer! If you encounter any problems in the configuration or have other questions about the setup, just reach out to our Customer Success team.