To avoid any unfortunate situations arising when handing over an end user to an agent in Zendesk, it is essential to check whether the agent is available first.
In this article, we'll explain how to check the availability of an agent in Zendesk and how to hand the conversation over if an agent is available.
Below, you'll find the following topics:
- Communication flow example: Checking agent availability and taking over an end user
- Creating the Availability Webhook
- Inserting the Availability Webhook
- Creating the Handover Webhook
- Inserting the Handover Webhook
Communication flow example: Checking agent availability and taking over an end user
To use the Availability Webhook, you'll need to create a flow where the Webhook is in one Module and the Custom Variables are in another Module. Having the Webhook and Custom Variables in two separate Modules ensures that there is enough time to validate the Webhook.
The following image shows a suggestion of how to create a flow with the Availability Webhook and Custom Variables:
Please be aware that the handover to a human agent will not take place if there are no online agents in the destination Zendesk department, so you must check the department's availability first.
Creating the Availability Webhook
In the first Module, you will have to insert the Availability Webhook in the Module’s connections. Before you can do that, you will need to navigate to the Webhook Marketplace and use the ![]() Zendesk Chat Agent Availability Webhook Template to create your own Webhook.
Zendesk Chat Agent Availability Webhook Template to create your own Webhook.
After selecting the template, the only value you need to define is the department the user will be handed over to. This department has to be the one that your human agents use, and it has to be different from the department that your bot is in. If they are in the same department, you will not be able to use the handover functionality.
For the purpose of this article, we will be using the department name "Bot_Operator".
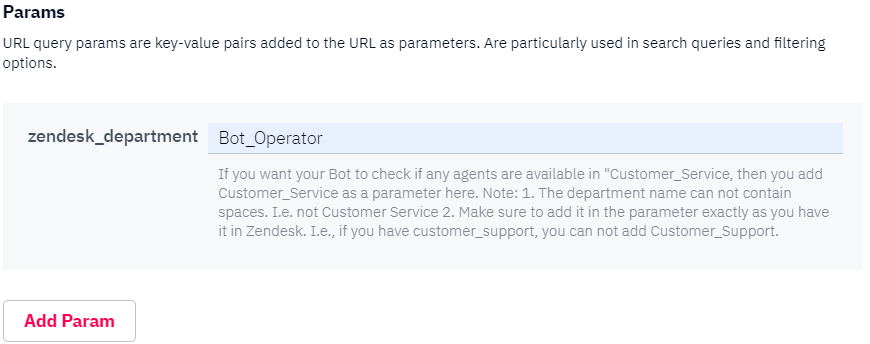
Please note, the name of the department in Zendesk cannot include spaces, and it is case-sensitive.
After defining the department, it is advisable to rename the Webhook to something more recognizable. Select "Save Webhook", and you're done.
Inserting the Availability Webhook
To insert the Availability Webhook into a Module, you must have already created it in the previous step. It will not show up otherwise. After creation, Webhooks are selectable in the drop-down menu, as displayed in the example below.
Below, you can see the process and image for how to structure the <md>Bot Asks User About Transfer Module and how to add Custom Variables.
Before transferring the end user to a human, it is advisable to check whether they want to be transferred.
The Custom Variable Bot_Operator_availability is the variable returned when firing the ![]() Zendesk Chat Agent Availability Webhook. It will have to be changed depending on which department name you have defined when creating the Webhook.
Zendesk Chat Agent Availability Webhook. It will have to be changed depending on which department name you have defined when creating the Webhook.
Remember to set the matcher rules to “Exactly match”, and add “True” or “False” to the “Add value” space. This will ensure that:
- if it’s true, there is an agent available, then the chatbot should send the user to the <md>Zendesk Chat Handover to Agent Webhook Module, and
- if it’s false, there is not anyone available, then the user will be sent to the <md>No Agent Available Module.

Please be aware that there is a limitation when using the availability Custom Variables in a Module. You cannot use the function "Don't wait for the user's reply, just evaluate the Connections" in the same Module as the one where you call the availability Custom Variables.
If an agent is available, and the end user has responded with "Yes" to whether they'd like to be transferred, you can make use of the ![]() Zendesk Chat Handover to Agent Webhook Template to transfer them.
Zendesk Chat Handover to Agent Webhook Template to transfer them.
Creating the Handover Webhook
The Handover Webhook ensures that an agent is notified in the Zendesk dashboard when there is a conversation they must respond to.
To create the Handover Webhook, you will need to navigate to the Webhook Marketplace and select the ![]() Zendesk Chat Handover to Agent Webhook Template.
Zendesk Chat Handover to Agent Webhook Template.
As you've done previously with the ![]() Zendesk Chat Agent Availability Webhook Template, you will need to insert the name of the department you want to transfer the user to.
Zendesk Chat Agent Availability Webhook Template, you will need to insert the name of the department you want to transfer the user to.
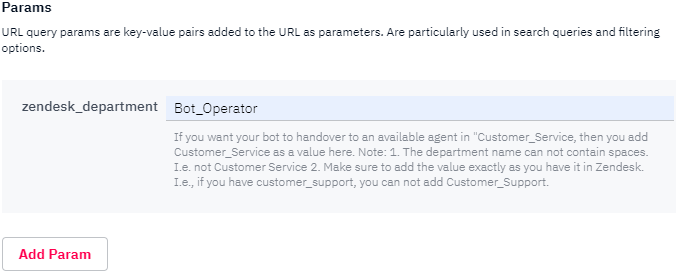
Please note, the name of the department in Zendesk cannot include spaces, and it is case-sensitive.
After defining the department, it is advisable to rename the Webhook to something more recognizable. Select "Save Webhook", and you're done.
Inserting the Handover Webhook
To insert the Handover Webhook into a Module, you must have already created it in the previous step, otherwise, it will not show up.
After creation, Webhooks are selectable in the drop-down menu, as displayed in the example below:
After firing the Webhook, there will be no notification in the chat signifying that the user has been handed over to the agent. The only time a notification appears is when the agent opens the chat window. Therefore, you should add some text in the Bot Message to inform the end user that they might be expected to wait a few minutes.
You should also ensure your Session Expiration is set to more than a few minutes. Otherwise, you may face issues if your human agents take longer than expected to respond to the end user.