Modules are the main building blocks when you design your bot’s conversation flow. There are two different types of Modules: Statement Modules and Collector Modules. In this article, the focus lies on Statement Modules.
We'll explore the following:
- Introduction to Statement Modules
- Understand the basic Module features
- Connection(s) of a Statement Module
- Define a Fallback
Introduction to Statement Modules
The Statement Module is the most frequently used Module, mainly due to its flexibility. Among other actions, you can:
- add free text to the Module,
- make the statement responsive to end users' input,
- suggest possible user responses, or
- move forward to the next Module without any end user input.
To add a Statement Module, you can either right-click and select "Add new module - Statement", or navigate to the right sidebar menu and select "Add new module - Statement".
Understand the basic Module features
It's important to understand the basic features of a Module. See an overview of these here:
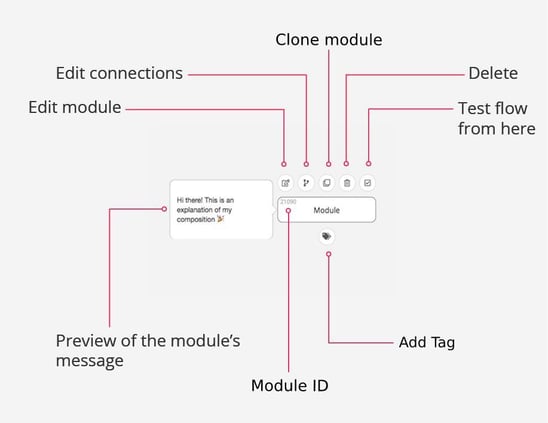
The key features are described in detail in our article on how to edit a Module, including information on using the Module ID as a unique ID for conversational flows.
Connection(s) of a Statement Module
You can edit the Module's connections in the “Connections” tab of the Module.
Here, you'll define actions that must happen after the bot's response, such as proceeding to another bot answer based on the end user's response.
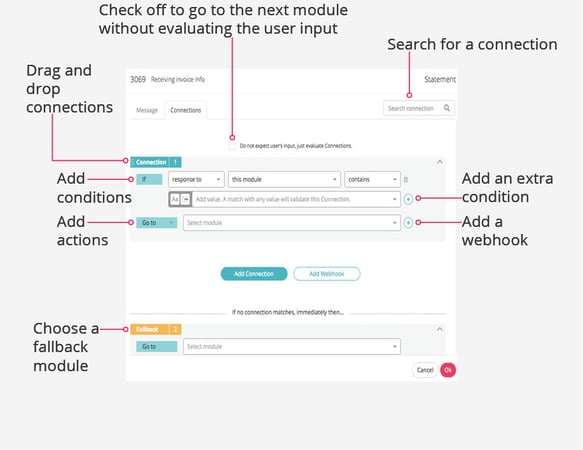
Don't wait for the user's input, just evaluate the Connections
If you'd like to send the end user directly to the next bot message without taking into account any user input, mark the checkbox “Don’t wait for the user’s input, just evaluate the Connections”. This requires a connection to be defined because the end user can never be sent to a random Module (explained further below).
Add Connection
Create a new connection by selecting the button “Add Connection”. The default connection that appears must then be adjusted in accordance with the next desired steps of the chatbot conversation. This is where conditions and actions come in.
Conditions and actions
The logic of connections is comparable to an Excel IF function, and you can add more conditions by clicking on the plus button to the right of the current condition.
If you want additional information, read more about a Module's connections.
The last line defines the action that will be taken once any defined conditions are fulfilled, such as to which next Module the bot should go. If no conditions are defined, the bot will go to the next defined Module without checking any conditions.
Delete the condition by clicking on the trash icon to the right of the condition. The connection will then appear as a fallback, and you can choose which Module to send the end user to.
Again, please note that you must tick the checkbox "Don’t wait for the user’s input, just evaluate the Connections” if you want the user to be directly sent to a designated Module. However, keep in mind that conditions are usually defined since the flow of a human-like conversation includes the user's input.
Define a Fallback
Almost all Statement Modules require a Fallback Module. A Fallback is activated if the end user’s input cannot be understood by the chatbot. The Fallback Module can be, for example:
- a general response explaining to the end users that their intent was misunderstood,
- a list of possible actions to try again, or
- a CTA to contact (human) support.
If you need to avoid a Fallback for a certain conversational flow, create an empty Module for the end user to be guided to.