You can use our Webhook Templates to interact with Klaviyo straight from a Certainly chat. Doing so enables you to grab real-time data about the customers interacting with your bot to improve marketing communications.
In this article, we'll first explain how to access your Klaviyo API Key. Then we'll explore the different API requests you can make to the Klaviyo API using our Webhook Templates. Please note that admin access to the Klaviyo environment is required.
- Obtain your Klaviyo API Key
- Track and send events from the chat to your Klaviyo account
- Include users in a marketing notification list
- Update the user email in your Klaviyo account
Integrated with a Shopify store? Consider combining forces by connecting it to your Klaviyo environment too.
Obtain your Klaviyo API Key
In your Klaviyo dashboard, you'll need to select your company name in the upper-right corner of the screen. When the pop-up window appears, select "Account", then navigate to "Settings". When the next pop-up window appears, select "API Keys".
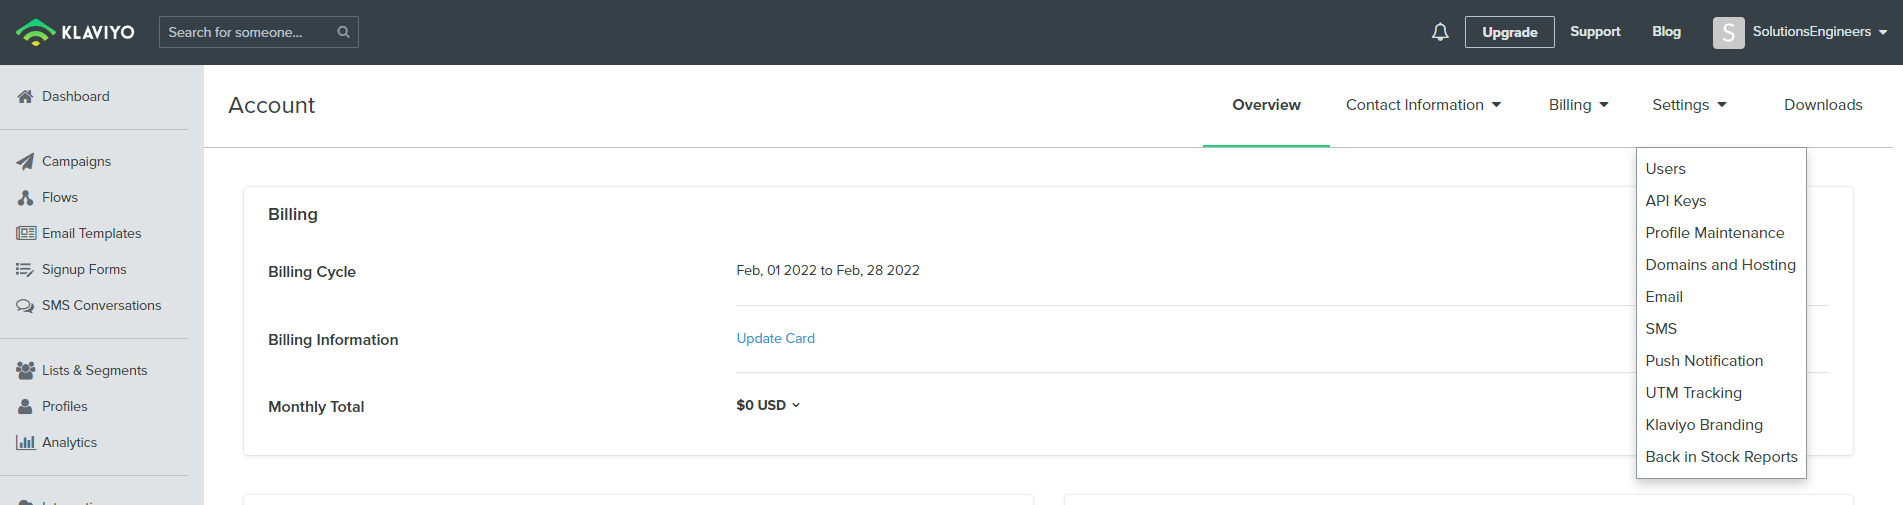
In the API Keys section, you'll find your public API Key. However, for most of the Webhooks to function correctly, you'll need a private API Key as well. You can generate this by selecting "Create Private API Key".
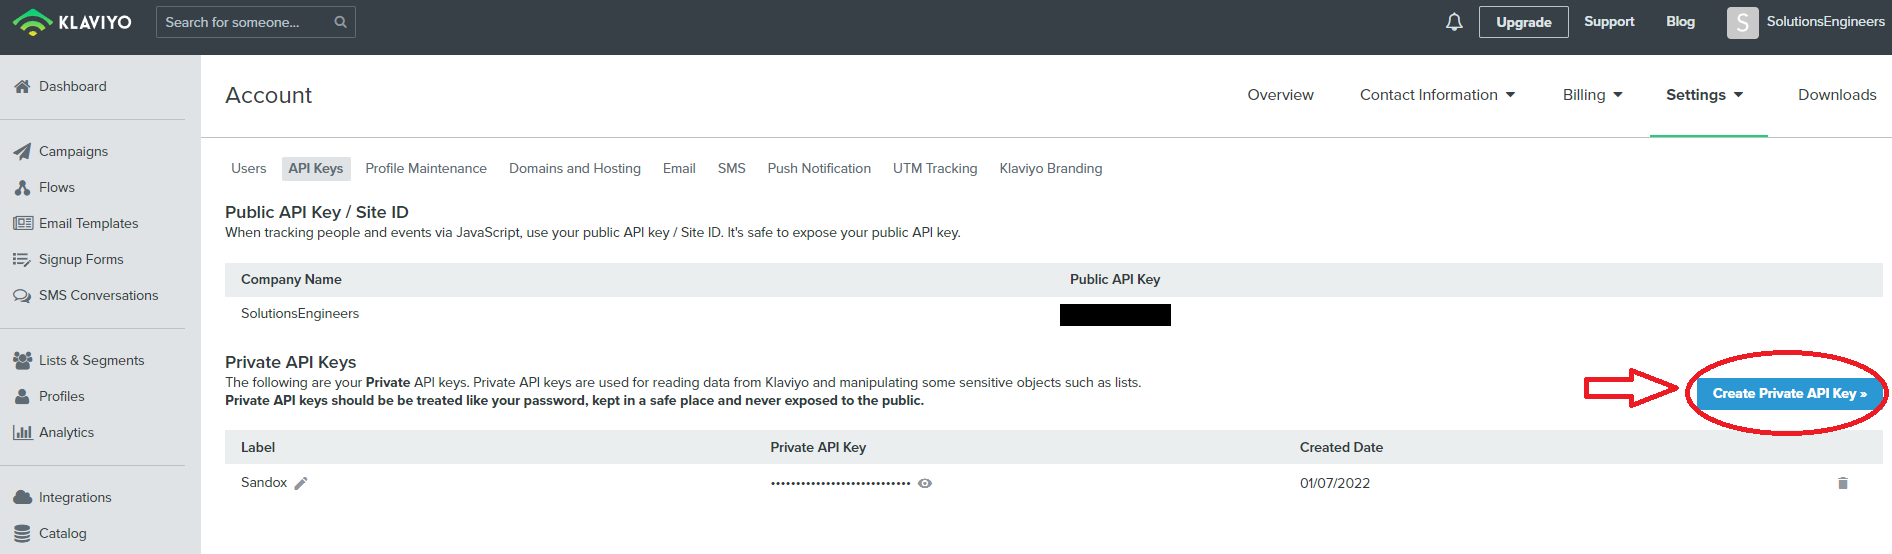
Once generated, both of your keys will be accessible from this section.
Track and send events from the chat to your Klaviyo account
This integration will allow you to track user activity inside your bot and send those events directly to the users' profiles in your Klaviyo account. In order to easily visualize this with an example, we will simulate a user ordering a product through the bot.
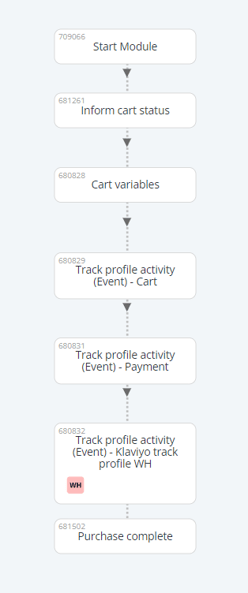
The following flow covers this use case:
- For this integration to work as intended, the user's email address must be stored in a variable inside our bot. For this, we can either ask the user for their email inside the flow and use Collector Modules to store the response inside a variable, or we can pass the variable containing the user email directly from the website using Custom Variables (CVars).
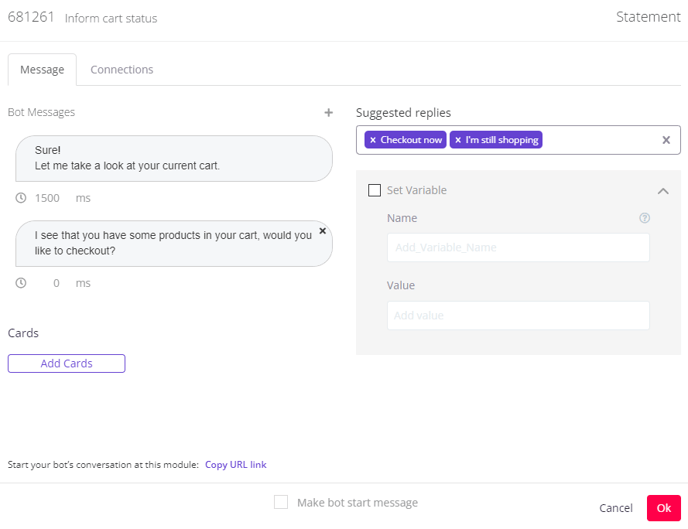
This second method would be especially interesting if the customer chatting with the bot has already logged in to your website as a registered user, as it will allow the user to avoid inputting this data once again. - In the <md>Inform cart status Module, we simply prompt the user to check out.
- If the user confirms they want to check out, we save the current cart articles as variables inside the <md>Cart variables Module. These variables will be necessary to provide additional information inside the event we send to Klaviyo.
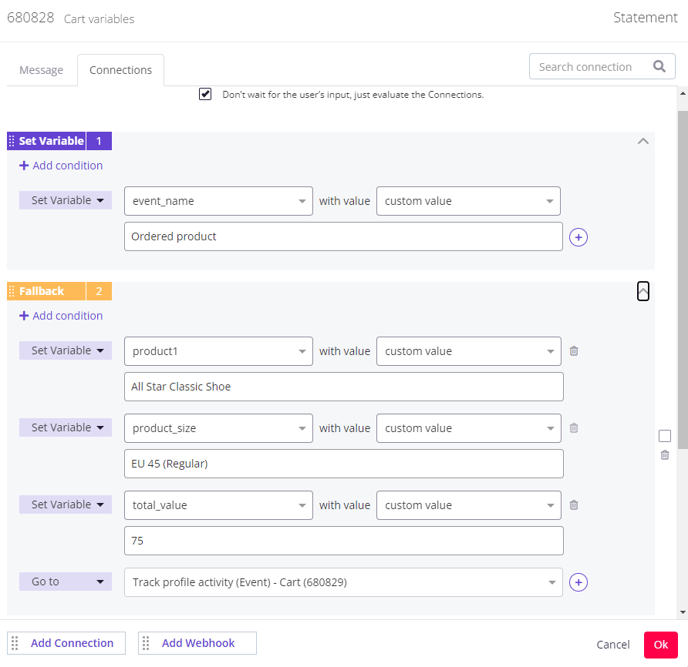
In this instance, since the event we're triggering is that of an order being made, we'll be including the name, size, and value of the product inside the event. - In the <md>Track profile activity (Event) - Cart and <md>Track profile activity (Event) - Payment Modules, we use Dynamic Cards to show the user the products they have in the cart. Then we ask if they want to proceed to payment.
- Once the payment has been made, we can launch the
 Klaviyo - Track Profile Activity Webhook. The Webhook configuration is detailed in the description at the top of the Webhook Template.
 - Once the Webhook is correctly configured and launched, we see the new user notification appear in the Profiles section of our Klaviyo account.
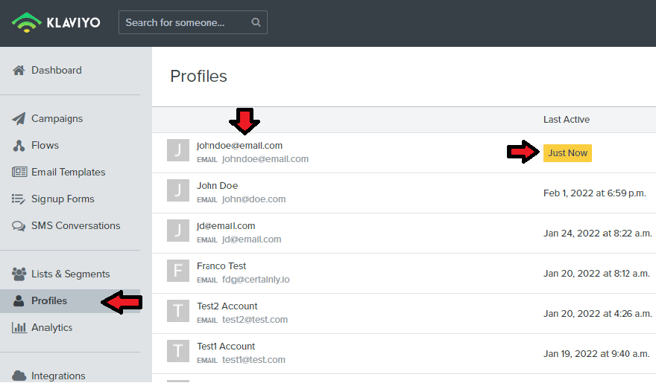
- Selecting the user profile allows us to see the user's data. If it is a new user, a profile for the user will be created while creating the event. For pre-existing users, only the event will be created; the user won't be duplicated.
In this simulation, a new event has been collected under this user: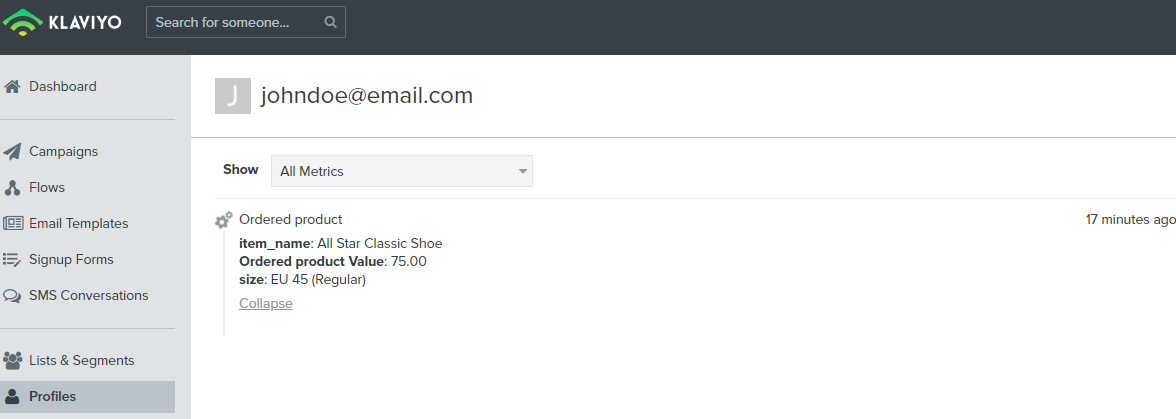
At this point, the event has been correctly transferred to Klaviyo. While in this example we were creating an event to log a product order, you can create other events as well, such as for returns or adding users to marketing notification lists.
For more in-depth information, read about the Track Profile Activity endpoint in the Klaviyo Developers documentation.
Include users in a marketing notification list
Another great tool Klaviyo grants users is the ability to create and use marketing notification lists. These lists, created through the Klaviyo platform, allow you to group customers in order to include them in marketing campaigns and send custom emails.
To take full advantage of this feature, we've created an integration that enables us to evaluate whether a user is already included in a specific list inside Klaviyo and, if not, add them to the list.
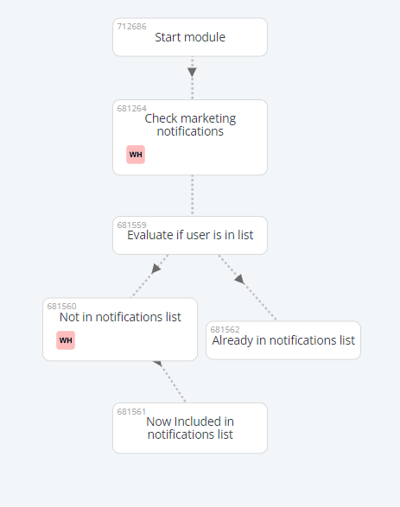
We've designed an example flow to explain this use case. Through a chat with the user, the bot evaluates whether the user belongs to a marketing notification list and, if not, asks if they'd like to be added to the list to receive future communications.
- For this integration to work as intended, the user's email address must be stored in a variable inside our bot. For this, we can either ask the user for their email inside the flow and use Collector Modules to store the response inside a variable, or we can pass the variable containing the user email directly from the website using Custom Variables (CVars).
This second method would be especially interesting if the customer chatting with the bot has already logged in to your website as a registered user, as it will allow the user to avoid inputting this data once again. - In the <md>Check marketing notifications Module, we send the user a message to let him know there is a marketing notification list that the user can join in order to stay up-to-date with discounts or other news.
In the background, we launch theKlaviyo - Check if Profile Is in a List Webhook, which takes the user's email to check if they're already on a given list. For more details, refer to the description at the top of the Webhook Template.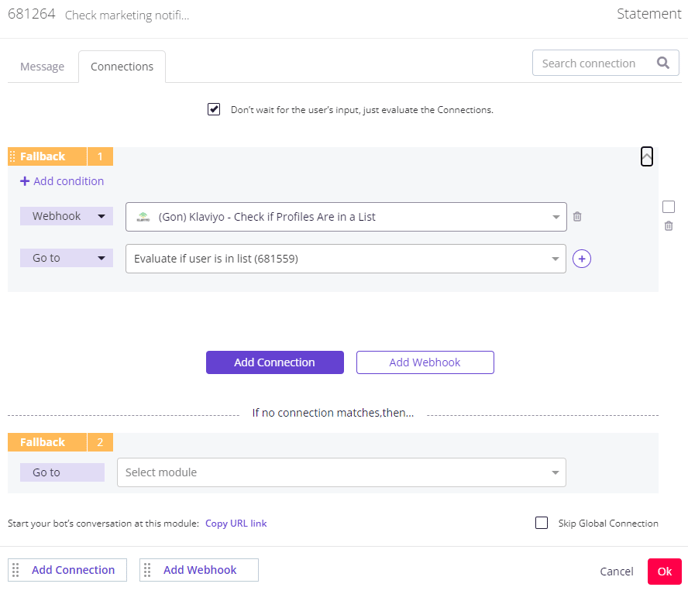
- In the <md>Evaluate if user is in list Module, we evaluate the Webhook results (stored in the variable "is_in_list") without sending the user any messages. If the Webhook response = [], it means the user is not currently on the list we searched.
If they're not included, we can set a very simple flow that evaluates this condition: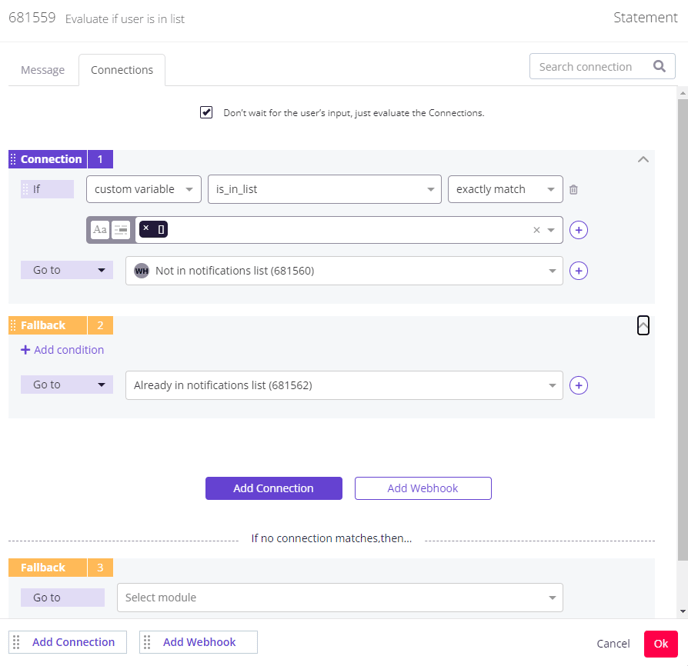
If the user is on the list, however, we inform them they're already included and continue the flow in a different direction. - In the case that the user is not currently on the notifications list, we move to the <md>Not in notifications list Module, in which we ask the user if they want to be added to the list to receive future communications.
If they accept, we launch our second Webhook,Klaviyo - Subscribe Profile to a List: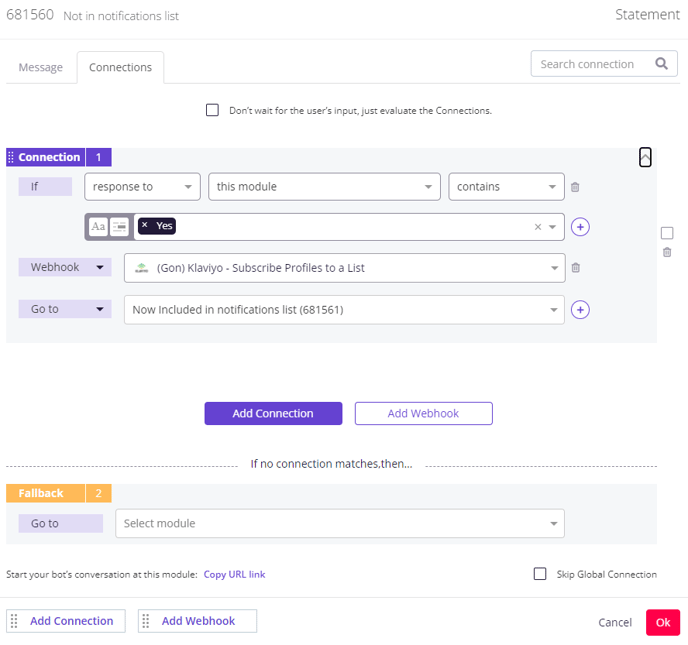
This Webhook allows us to directly submit the new email to the marketing notification list. You can check this by navigating to the Klaviyo platform > Lists & Segments and finding your list. Once you open it, you'll find a new user whose email corresponds to that of the user you just added to the bot.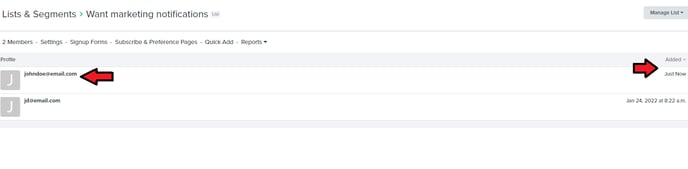
- Once the Webhook has been fired, we can let the user know that they've now been included in the marketing notification list. From that moment on, they are eligible for marketing campaigns straight from the Klaviyo platform.
Update the user email in your Klaviyo account
This tool allows you to modify the user data you've stored in your Klaviyo account. To highlight this use case, we've created a sample scenario in which the user requests to change the email to which he is receiving marketing notifications.
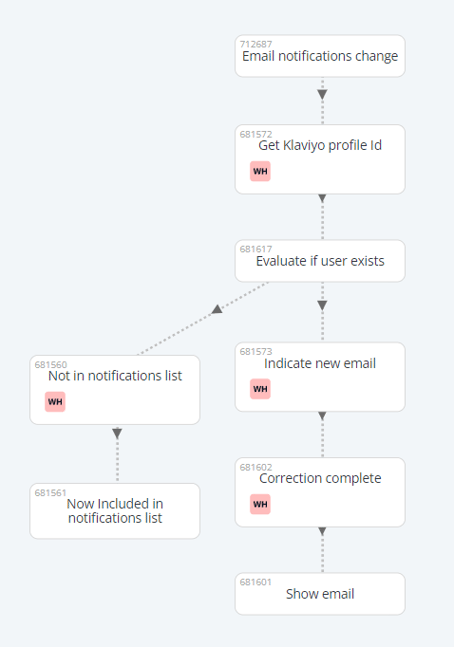
A simplified version of the flow could look like this:
- If the user indicates that they want to change the email to which they're receiving notifications, we first have to collect this email address in order to verify it is indeed included in one of our Klaviyo lists. For this, we ask the user for the email to which they're currently receiving notifications and use Collector Modules to store the response inside a variable.
We could also retrieve the user email directly from the website using Custom Variables (CVars). This method would be especially interesting if the user chatting with the bot has already logged in to your website as a registered user.
After that, we can show the user their email and confirm that this is the email they want to change. - Once the user confirms this is the email they're receiving notifications to, we move the conversation to the next Module, <md>Get Klaviyo profile Id. In this Module, we need to obtain the user's ID, which is required to modify the user's profile.
We can obtain this ID using theKlaviyo - Get Profile ID Webhook: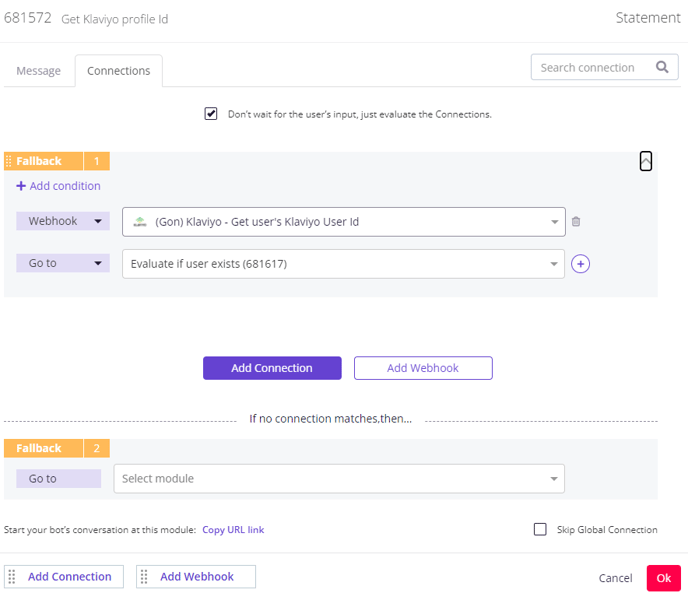
For more information on the Webhook configuration, please refer to the Webhook Template description. - In the next Module, <md>Evaluate if user exists, we evaluate the results of the previous Webhook. The way the Webhook is configured, it will return a variable containing the Klaviyo user ID of the email we input.
As such, we can set up a simple condition to evaluate if the user is registered in Klaviyo under the indicated email.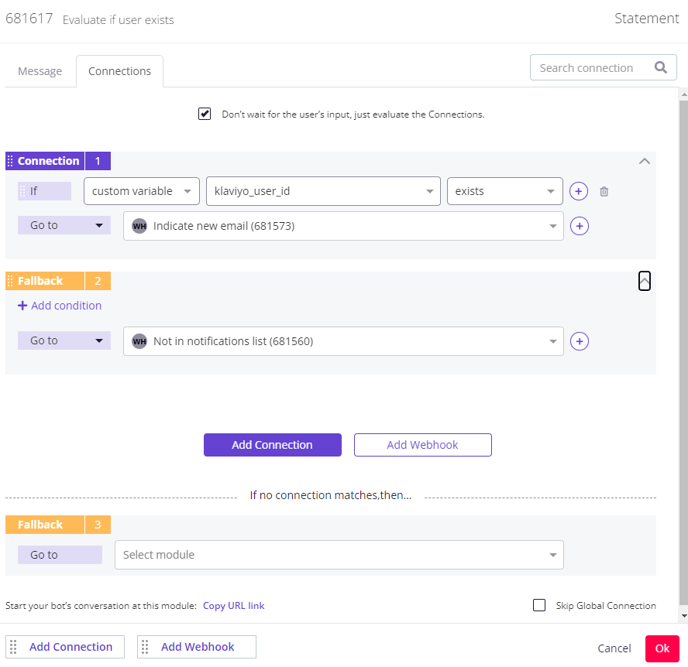
If the Klaviyo user ID exists, the user is correctly registered with that email and we can proceed with the change of email.
On the other hand, if the variable "klaviyo_user_id" is empty, it means this user is not registered in Klaviyo under that email. In that case, we can ask them what user email they'd like registered for the list and include it using theKlaviyo - Subscribe Profile to a List Webhook. - If the Klaviyo user ID exists, we continue with the change of email. For this, we first ask for the new email in order to do the change, using the <md>Indicate new email Module.
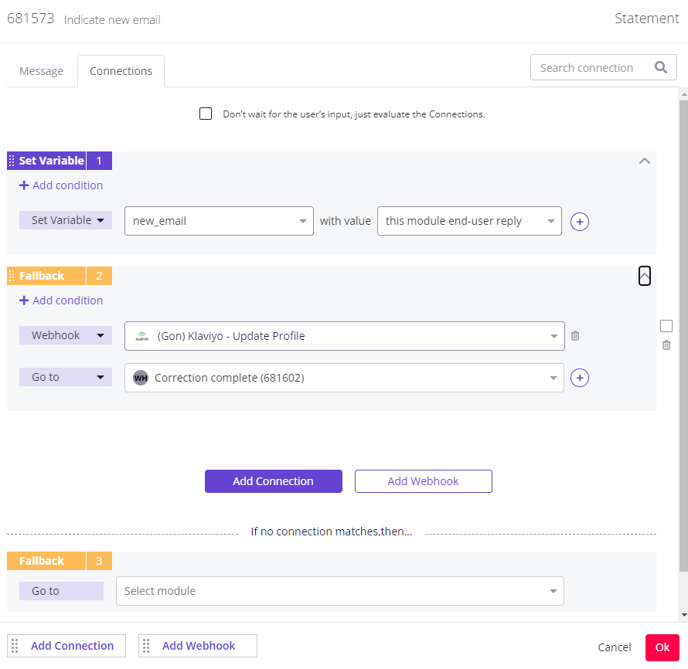
After we've stored the email in the "new_email" variable, we can launch theKlaviyo - Update Profile Webhook. This Webhook uses both the Klaviyo user ID we collected from the previous Webhook and the new email, which can be used in the Webhook as a parameter to update the value. Please check the Webhook Template description for more details.
Once the Webhook has been correctly configured and fired, you'll be able to see that the user email for the user in Klaviyo > Profiles has been changed, retaining all previous events and other data for this user.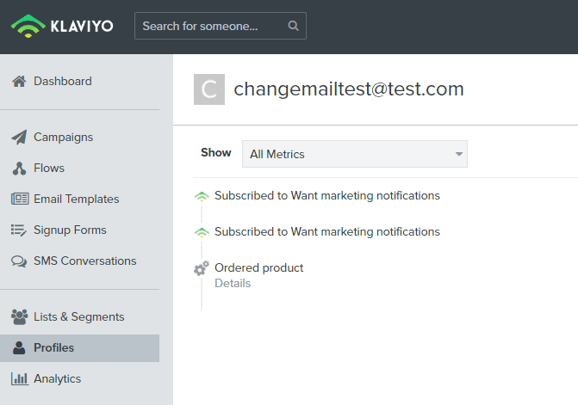
- Then, in the <md>Correction complete Module, we can launch the Klaviyo - Get Profile Webhook to make sure the user email has been correctly changed.
- We use one last Module, <md>Show email, to show the user that all new communications will be sent to the new email.