To create a Webhook (WH) from scratch, navigate to the Webhook Builder, then choose "Create from Scratch".
If you're an Agency, be sure to then select "Webhook" at the top of the next screen:![]()
You can also learn about creating a Webhook Template as an Agency or creating a Webhook from a Webhook Template.
Below, we'll explore the fields you'll see when you enter the "Webhook Creation" screen:
Basic Data
- Name: In this section, you'll enter the name of the WH. It's useful to name the WH in such a way that its purpose is clear and not left up to interpretation.

- Assign to: Here, you'll assign the WH to the Company that will use it. Please note that this field is only visible to Agencies.

- HTTP Request Method and API Endpoint: Next, pick your preferred type of HTTP request. We support many kinds of HTTP request methods, such as GET, POST, PUT, PATCH, DELETE, and more. Then enter the URL for the API Endpoint you'll use for the WH.

- Response Type: In the current iteration of the WH Builder, the only Response Type that we support is JSON. We expect to add support for XML in a future iteration.

- Conversation Execution: We support Synchronous Conversation Execution, meaning the conversation flow stops until the WH replies or times out. In the future, we plan to support Asynchronous Conversation Execution, meaning the conversation flow keeps running.

- Time out: Finally, choose the time out of the WH (how long the bot will wait for the external service to respond). The default setting is 5 seconds.

Authentication
In this field, we ask you to enter the type of authentication that the API connected to your URL Endpoint uses. The types of authentication you're able to choose are as follows:
- No authentication: This means that there will be no authentication of the API connected to your URL endpoint. In this case, there's no authentication information to put in.

- Basic authentication: A simple form of authentication that requires a username and a password for the API to be inserted into the fields.
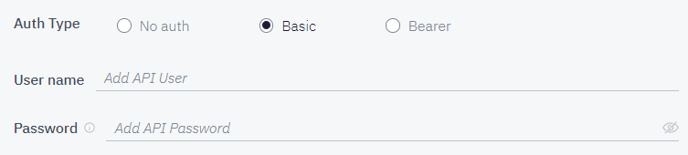
- Bearer authentication: This means that the authentication of the API is based on the bearer token system, so a security token must be inserted into the field.

Headers
Headers are responsible for carrying relevant data back and forth. This can be anything from the type of browser the user is using to how long you want to keep the connection active. In this field, you can include the information that you deem relevant for the data exchange.
When added, the Header fields appear as such: 
Params
Parameters, or query strings, are a part of the URL that you've selected as your URL Endpoint. With this function, you can either choose to put the parameters directly into the URL Endpoint in Basic Data, or you can enter the parameters into this field.
When added, the Param fields appear as such:
Context
Context Values are only available here when there are {{curly bracket values}} in the URL Endpoint. They can be used to render as specific subdomains when using the WHT for different environments, tenants, accounts, etc.
When available, a Context Value field may look similar to this:![]()
Body
With most HTTP requests, you'll send a body along with the request. This is typically the content that you wish to send to the third-party server.
When added, the Body appears as such:
The sample JSON below lists all the different variables that you can use to send Bot User or conversation metadata in the message body of the request:
{
"lastName": {% if fb is defined %}"{{fb.lastName}}"{% else %}{}{% endif %}, //Only available in FB channel
"replyData": {% if certainly.replyData is defined %}{{certainly.replyData|tojson}}{% else %}{}{% endif %}, //Validated Response in a Collector Module
"sessionId": {{certainly.sessionId}}, //Unique ID for the conversation
"attachedMedia": "{{certainly.attachedMedia}}", //Empty value for now
"direction": "{{certainly.direction}}", //"in" or "out". Always "in" for now. "in" if it is a message from the end user to the bot, and "out" if it is a message from the bot to the end user
"reply": "{{certainly.reply}}", //Raw user response
"extractedData": {% if certainly.extractedData is defined %}{{certainly.extractedData|tojson}}{% else %}{}{% endif %}, //JSON with previously validated responses
"botId": "{{certainly.botId}}", //Bot UUID
"botDeploymentId": "{{certainly.botDeploymentId}}", //Bot deployment UUID
"firstName": {% if fb is defined %}"{{fb.firstName}}"{% else %}{}{% endif %}, //Only available in FB channel
"customVariables": {% if certainly.customVariables is defined %}{{certainly.customVariables|tojson}}{% else %}{}{% endif %}, //Previously generated Custom Variables
"moduleId": {{certainly.moduleId}}, //ID of the current module
"to": "{{certainly.to}}", //Channel ID
"from": "{{certainly.from}}", //Bot User External ID
"botTrainedModelId": "{{certainly.botTrainedModelId}}" //The UUID string for the AI model key
}
Run Webhook
Once you've completed all the preceding steps and filled in the required fields, it's time to run your WH. This is useful as it allows you to check the result of the WH Response, as well as define and review the Custom Variables you extract.
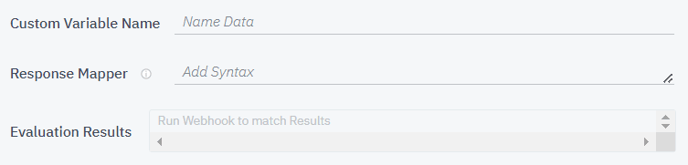
Custom Variables
In this field, it is possible to define one or more Custom Variables without needing to run the WH. The Custom Variable values are parsed from the WH Response using the Jinja2 path added in the "Response Mapper" field.
When you choose to define a new Custom Variable, the fields appear as such: