The ![]() Certainly Dynamic Email Notification Webhook Template is a tool that allows you to send a notification email to an email address of your choosing. This can be useful for notifying customer support personnel that an end user wants to be contacted regarding an issue.
Certainly Dynamic Email Notification Webhook Template is a tool that allows you to send a notification email to an email address of your choosing. This can be useful for notifying customer support personnel that an end user wants to be contacted regarding an issue.
In this article, we'll address:
- Example notification email
- Creating the email notification Webhook
- Using the Custom Variables in your bot
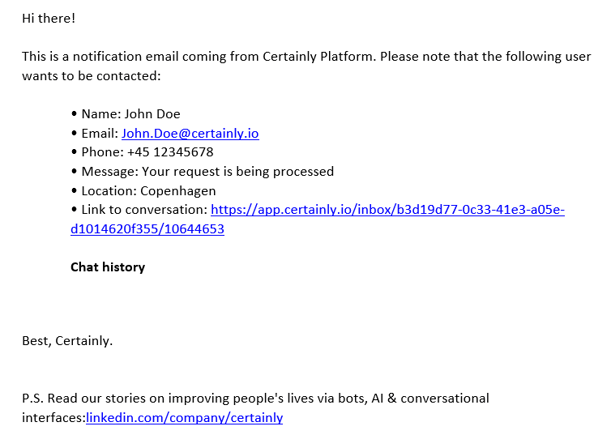
Example notification email
This is an example of the email received by your customer support staff:
In the following sections, we'll share how to create the Webhook (WH) and use the Custom Variables (CVars) in your bot.
Creating the email notification Webhook
By default, the Webhook Template (WHT) supports the following variables:
js
{
 "config": {
   "subject": "Certainly Email Notification",
   "featuredImage": "https://botxofilestorage.blob.core.windows.net/botxo-assets/BotXO Logos/Logo-on-dark.png",
   "greeting": "Hi there!",
   "introMessage": "This is a default notification email coming from the Certainly Platform. Please note that the following user wants to be contacted:",
   "recipient": "test@certainly.io",
   "closure": "Best,<br>Arnie - your virtual assistant from Certainly",
   "postScriptum": ""
 },
 "data": {
   "key": "value",
   "key2": "value",
   ...
 }
}
- It is possible to change all the values displayed above, however, you must not delete any of the keys in the "config" object. If any of the keys are deleted or changed, the email will not be sent. The only keys you can create/edit/delete are the ones in the "data" object.
- If you change the image displayed at the top of the email (featuredImage), you will need to ensure the replacement image has a resolution of 400 × 168 to avoid stretching.
In your WH, you'll need to modify the "data" object of the body to define the variables you want to include in the email. For this example, we'll use the following variables:
js
 "data": {
   "Name": "{{collectedName}}",
   "Email": "{{collectedEmail}}",
   "Phone number": "{{collectedNumber}}",
   "Message": "{{collectedMessage}}",
   "Link to conversation": "https://app.certainly.io/inbox/{{botId}}/{{sessionId}}"
 }
- You can add as many or as few variables as you'd like.
- Through the link in "Link to conversation", customer support personnel can navigate directly to the conversation that led to the email being sent. The variables {{botId}} and {{sessionId}} are filled automatically. To see what other information you can append to a webhook, please visit our article on Reserved Keywords.
- Please be aware that you are not able to access the link generated without having the appropriate credentials for the Certainly Platform.
Using the Custom Variables in your bot
After adding the variables you want to use, all you need to do is to click "Save Webhook" and start using the CVars in your bot. Below, you'll find a rudimentary flow that shows how you would collect those values from the end user and send them:
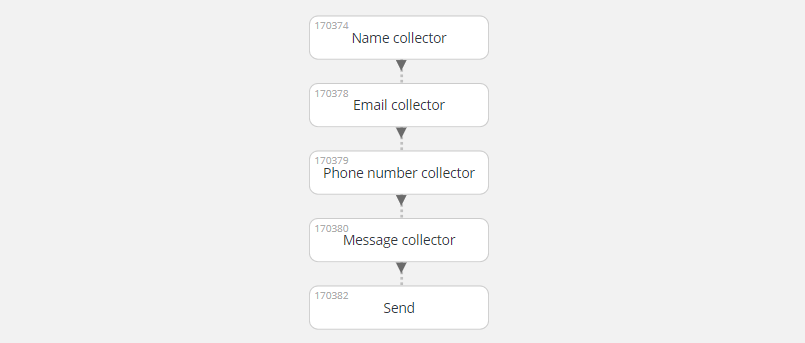
In each of the first five Modules, the bot asks the end user to provide some information, such as their name. This process is repeated in each Module, ensuring we collect the values for each variable defined in the "data" object.
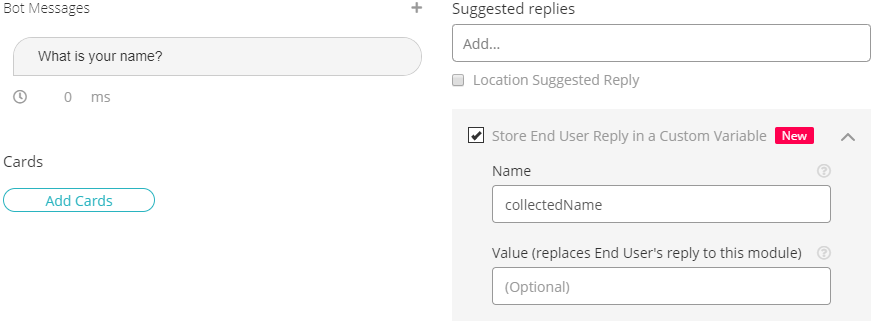
By storing the end user reply in a CVar, you'll be able to use it later in the flow (and for your email notification WH).
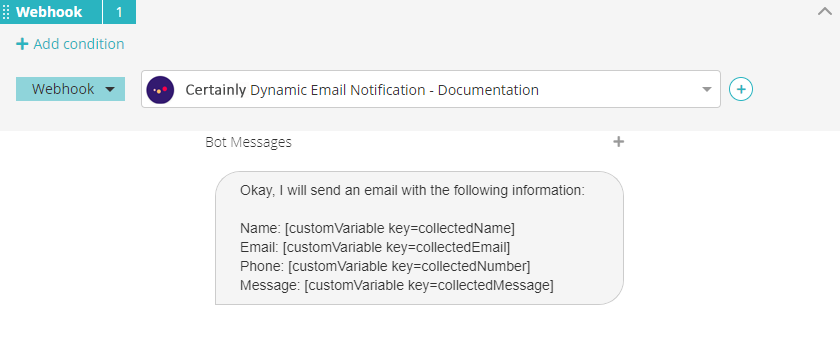
In the last Module, <md>Send, the bot sums up the information the end user has given, then fires the WH that sends the email with the provided information:
That's it! If you haven't yet, navigate to the Webhook Builder Marketplace to get started.