There are two ways for the Certainly bot to retrieve order information from the Shopify store. In this article, we'll address each of these, including step-by-step instructions:
Shopify API request
This guide is specific to a GET request for orders linked to an email using the ![]() Shopify Get Order by Email (Dynamic Card Rendering) Webhook.
Shopify Get Order by Email (Dynamic Card Rendering) Webhook.
Please follow these step-by-step instructions for the Webhook setup and bot configuration to ensure the process is successful. Note that the bot used in this example only contains the Order Status/Lookup flow.
- Open Certainly's Webhook Marketplace to create a Webhook from a template. Search for the
 Shopify Get Order by Email (Dynamic Card Rendering) Webhook. Follow the instructions provided in the description at the top of the Webhook Template. If upon selecting "Run" you were able to see the "order_cards" variable mapping a result, you're ready to configure your bot.
 - If you're starting from a new bot, change the name of the "Starting module" to "Order Lookup". If not, create a new Module and name it "Order Lookup". Then navigate to the Connections tab of the <md>Order Lookup Module.
- Check the box labeled "Don’t wait for the user’s input, just evaluate the Connections", then select Add Connection. Remove the "If" condition by clicking the trash can symbol inside the connection area.
- Open the drop-down menu to the right of "Go to", select "Create New Module", and name it "No Auth Collect Email".

- The <md>No Auth Collect Email Module collects the customer's email and stores it in a Custom Variable from the response, such as customer_email.
Pro tip: For testing purposes, we recommend creating a Suggested Reply in the Messages tab of the <md>No Auth Collect Email Module using an existing email address that has active orders in your Shopify store. This will make it faster for you to check the flow at the end of this process.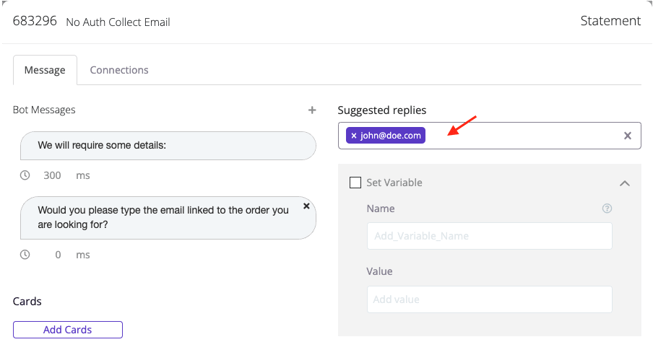
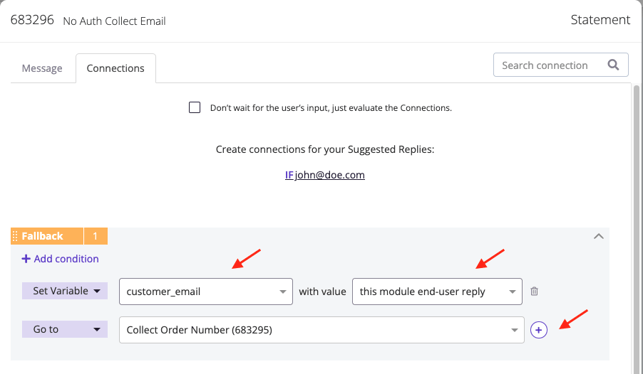
- In the Connections tab of the <md>No Auth Collect Email Module, add a connection and remove the "If" condition by clicking the trash can symbol inside the connection area.
- Open the "Go to" drop-down menu and change it to "Set Variable". Where it says Add_Variable_Name, insert the customer_email variable you defined in the Params section of the Webhook. Then, from the "Add value" drop-down menu, select "this module end-user reply".
- Select the plus (+) button to the right and add a "Go to" connection. Select "Create New Module" from the drop-down menu and name it "Collect Order Number". Then save your changes.
- Open the <md>Collect Order Number Module and enter the Bot Message you wish to be displayed in this part of the flow. Open the Connections tab, click on "Add a connection", remove the "If" condition, select "Go to" and change the Connection type to "Set Variable". Set variable order_number with value "this module end-user reply".
- Select the plus (+) button and add a "Webhook" connection. Select Shopify Get Order by Email (Dynamic Card Rendering) from the drop-down menu.
- Select the plus (+) button and add a "Go to" connection. Select "Create New Module" from the drop-down menu. From here, we have two choices, identified as A and B below:
A. *This version has an optional step that is highly recommended for information security.*
Name the new Module "Verification Module". Select "Ok" and save.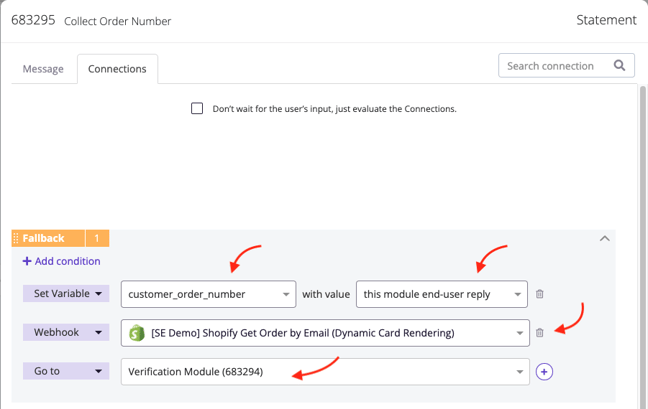
Then open the <md>Verification Module you just created. In this Module, we use the order_match logic to compare every order_number from the Webhook response against the order_number typed by the customer in the <md>Collect Order Number Module reply.
If they match, the order_match variable will print "true". At this point, we choose a "Go to" connection, select "Create New Module", and name it "Show Order Lookup Result". If it doesn't print "true", the flow moves to the designated Fallback, a new Module named "Failed verification".
You can see how to set up these connections in the following image: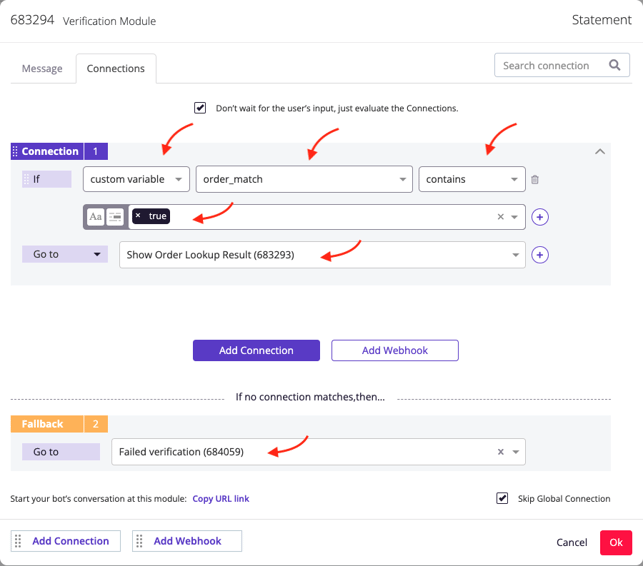
The <md>Failed verification Module should display a message explaining that it didn't match and, without waiting for user input, connect to the <md>No Auth Collect Email Module to start over. Check out the image below to see how the Connections tab should look. Remember to save!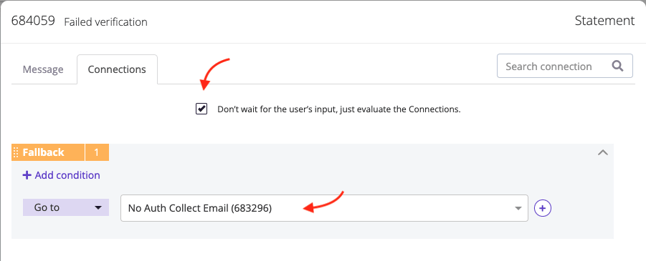
B. *This version removes the recommended information security step from Option A.*
Name the new Module "Show Order Lookup Result". Select "Ok" and save.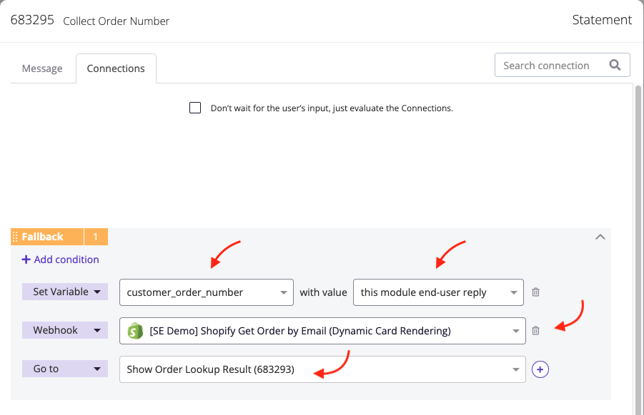
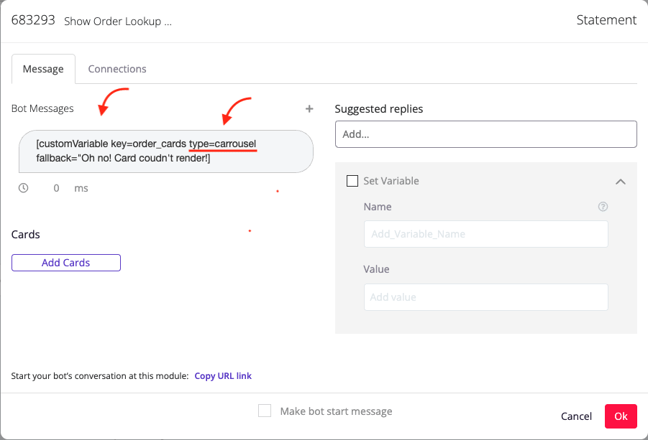
- The next step is to render the cards in the <md>Show Order Lookup Result Module. Open the Module and click on the Bot Message bubble within the Message tab. Delete the "Example message!" text, then select Custom > Variable > order_cards.
- Inside this new Custom Variable, you need to pass a variable type with a keyword to create the carrousel (no, it's not a typo - caRRousel). You can also pass fallback text in case the Cards aren't displayed due to an error. It should look like this: [customVariable key=order_cards type=carrousel fallback="Oh no! Card couldn't render!"]. Don't forget to save!
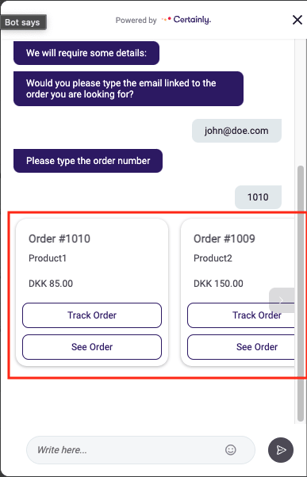
- If you were able to follow these steps successfully, you should be able to see at least one card from the email address you used once you test the flow.
Note: If you followed the pro tip we recommended in step 5, you should remove the Suggested Reply with the customer's email address from the <md>No Auth Collect Email Module after testing.
Pass variables from the Shopify store
It is possible to pass some variables from the store to the bot to be used in the conversation.
If you followed the steps for deployment using the code snippet and did the Shopify API request integration and bot configuration, we can add one more Module to make it more efficient for all involved at the time of handling the conversation.
Follow these steps to complete the integration:
- Navigate to the <md>Order Lookup Module's Connections tab and select Add Connection. You will need to replicate the image below with the correct variable names used in the Webhook. Then in the drop-down menu to the right of "Go to", select "Create New Module" and name it "Logged in".

- Go to the <md>Logged in Module's Message tab and create a message to give the customer the option to input a new email address from the one they are using when logged in your store, offering Yes/No Suggested Replies.
To inform them about the account they are currently logged in to, you could pass variables into the messages which are accessible if passed through from the code snippet (customer_name, customer_email, customer_orders).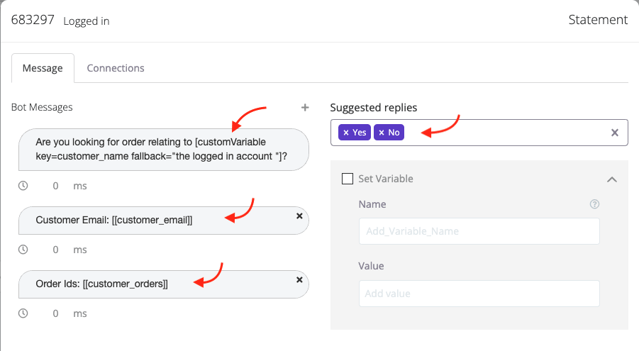
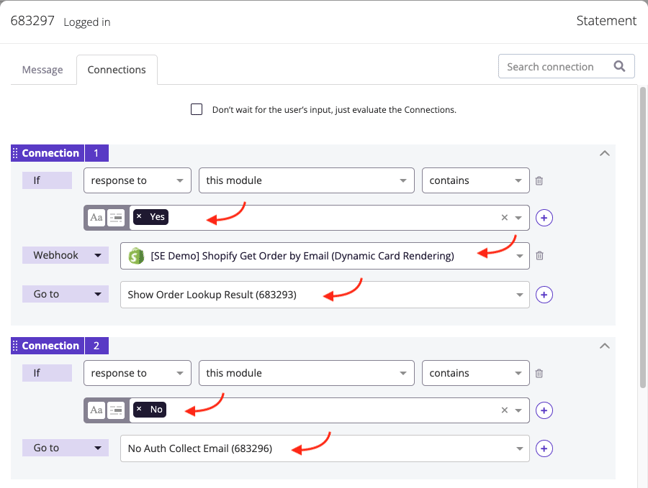
- Go to the <md>Logged in Module's Connections tab and select Add Connection. Remove the "If" condition, then click on the "Go to" drop-down menu, select Webhook, and find the Shopify Get Order by Email (Dynamic Card Rendering) Webhook.
- Click the plus (+) button, add a "Go to" connection, and select the <md>Show Order Lookup Result Module.
Once you save your changes, publish your bot (and deploy with the snippet included).
You will be able to log in to your store as a customer, and that information will be passed to the bot. If you don't have a customer account, it will default to the <md>No Auth Collect Email Module flow.