So you've created your chatbot in the Certainly Platform and you're ready to connect it with your Zendesk account! To integrate the chatbot with your Zendesk account, there are two steps, which we will review below:
- Creating an agent for your chatbot in your Zendesk account
- Connecting your chatbot to your Zendesk account
To connect a chatbot with Zendesk, you'll need a Zendesk Chat Enterprise-level subscription.
Creating an agent for your chatbot in your Zendesk account
To create an agent for your chatbot, go to your Zendesk account. Before creating this agent, it is essential that you have an e-mail you can use to set up the chatbot’s agent account. The e-mail should be one you can access, as you will receive a confirmation e-mail to set up the agent’s account password, but the e-mail should not be tied to any other agent in the Zendesk account.
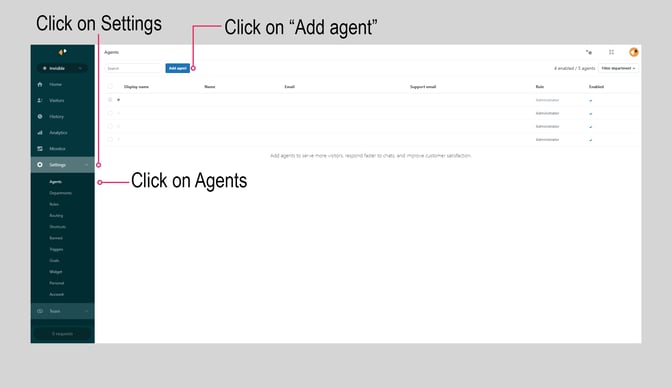
When you have an e-mail for the chatbot, you can create the agent. This is done by going to the Zendesk Chat Dashboard. To find the Zendesk Chat Dashboard, navigate to Settings. Under channels, select "chat" and then "Chat Dashboard".

In the Chat Dashboard, navigate to Settings > Agents > Add Agent. When you select"Add Agent", a new window will open.
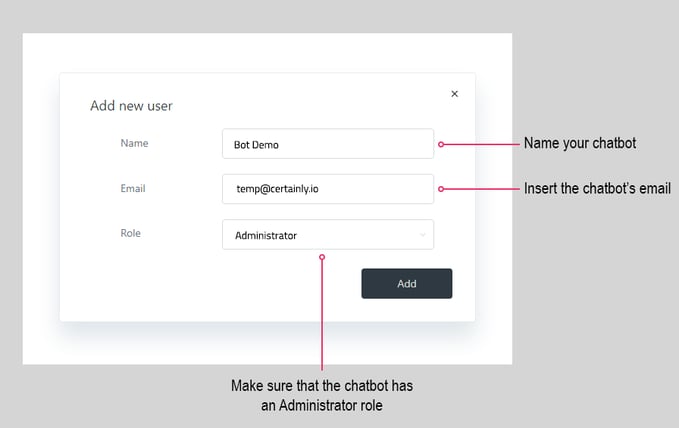
Here, you'll name the bot, insert the bot's e-mail, and give the chatbot the role of Administrator. Please be sure to provide the chatbot with a name that will be easy to recognize later.
When you have created an agent for the chatbot, you will receive an e-mail on the chatbot's e-mail, where you can log in and set a password for the bot on Zendesk.
Make sure the newly created agent has Zendesk Chat enabled, as the configuration takes place in the Zendesk Chat dashboard. To enable Zendesk Chat for an agent, navigate to https://zzzzz.zendesk.com/chat/agent#agents/ and click on the bot agent. Select "Edit profile", and go to the tab "Products and roles", where you can enable Zendesk Chat for the bot.
Connecting your chatbot to your Zendesk account
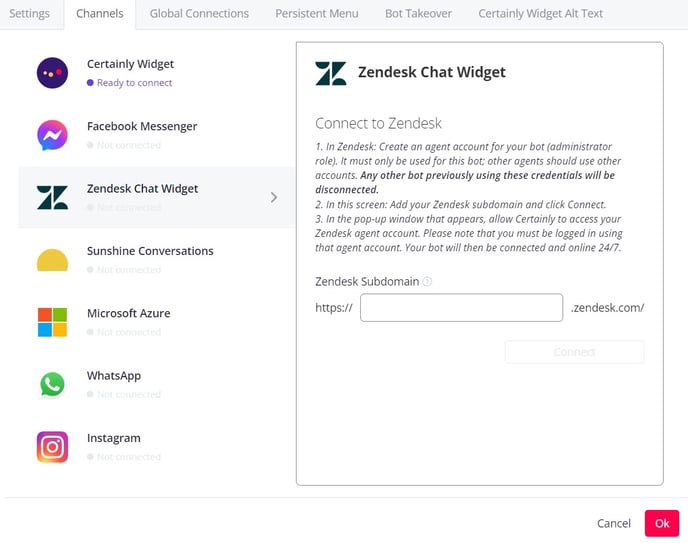
Now it's time to connect the chatbot to your Zendesk account. Navigate to Bot Settings > Channels > Zendesk Chat Widget.
All you will need to fill in here is your Zendesk Subdomain. Since you've already created an agent, you can retrieve the subdomain by navigating to the Zendesk Chat dashboard. The URL should look something like this:
https://zzzzz.zendesk.com/chat/agent#home
The subdomain is everything between "https://" and ".zendesk.com", which in this example is "zzzzz". Copy and paste this into the "Zendesk Subdomain" text input field shown in the following image:
Then select “Connect”. Make sure you have pop-ups unblocked for the Zendesk domain in your browser. If pop-ups are blocked in your browser, you will have to refresh the Certainly page and connect again.
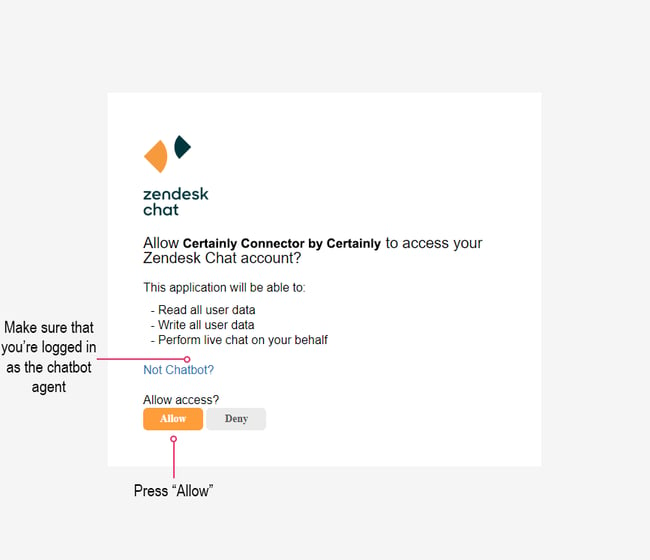
Make sure you're logged in as the chatbot agent on Zendesk while connecting.
In the pop-up, you'll select “Allow”, after which you'll be re-directed to the Certainly Channels tab, where you will be able to see the status changed to “Connected”. Then you'll need to select “Ok”.
After selecting "Ok" in Bot Settings, you will need to save & publish the bot before the chatbot will take any chats in Zendesk.
Integration with Zendesk is now complete! The only action left is to embed the Zendesk Widget script on your website. Questions? Please reach out to support@certainly.io so a Customer Success team member can help.