When an end user is chatting with your bot outside opening hours, it can be useful to design a flow that allows them to leave a message. That way, the human agents may respond to user requests when they are next available.
If you have a Zendesk Support subscription, you can accomplish this with our ![]() Zendesk Support Create Ticket Webhook Template, which we'll describe below. No Zendesk Support subscription? Try our
Zendesk Support Create Ticket Webhook Template, which we'll describe below. No Zendesk Support subscription? Try our ![]() Certainly Dynamic Email Notification Webhook Template.
Certainly Dynamic Email Notification Webhook Template.
Need more info on Webhook data formatting and processing? Check out our article on configuring Webhooks - we recommend resources on JSON and Jinja as well.
In this article, we'll share a helpful video and address authentication, common configurations of the ![]() Zendesk Support Create Ticket Webhook Template, and how to test the Webhook.
Zendesk Support Create Ticket Webhook Template, and how to test the Webhook.
- Video tutorial
- Authentication
- Simple ticket
- Ticket with tags, form ID, and custom fields
- Ticket with chat transcript and HTML comment
- Adding more comments to the ticket
- Testing the Webhook
Video tutorial
For a step-by-step approach to ticket creation in Zendesk Support, please refer to this video:
Authentication
This Webhook requires authentication. We recommend using an API token generated in Zendesk. API tokens are managed in the Admin Center interface. Navigate to Apps and integrations > APIs > Zendesk API.
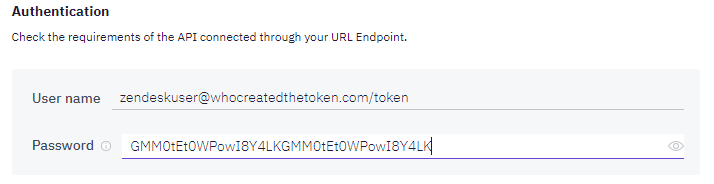
You can find additional details in Zendesk's article on API security and authentication.
Simple ticket
{
  "ticket": {
    "requester": {
      "name": "{{visitor_name}}",
      "email": "{{visitor_email}}"
    },
    "subject": "Ticket automatically created from Certainly",
    "priority": "normal",
    "type": "task",
    "comment": {
      "public": true,
      "body": {{visitor_message | tojson}}
    }
  }
}
- "requester" - Object that identifies the user. If omitted, the ticket will be created on behalf of the user used in Authentication. If the user exists in Zendesk, only "email" is required, and all other fields in the "requester" object will be ignored. For a new user, the "email" and "name" fields are required, and you can also add a "phone" field for the phone number. Zendesk will create a new user record with all the information provided.
- "priority" - Valid values are: "urgent", "high", "normal", or "low".
- "type" - Valid values are: "problem", "incident", "question", or "task".
- "comment" - User's message. It can be public ("public": true) or internal ("public": false). The actual message can be passed as a text via the "body" field or as HTML via an "html_body" field. We recommend using {{visitor_message | tojson}} syntax (note there are no double quotes) instead of "{{visitor_message}}" as it ensures the JSON body is not broken if {{visitor_message}} has newline or other special characters.
More details can be found in Zendesk's article on API ticket creation.
Ticket with tags, form ID, and custom fields
{
  "ticket": {
    "requester": {
      "name":  "{{visitor_name}}",
      "email": "{{visitor_email}}"
    },
    "subject": "Ticket automatically created from Certainly",
    "priority": "normal",
    "type": "task",
    "comment": {
      "public": true,
      "body": {{("Message1 : " ~ visitor_message1 ~
                 "Message2 : " ~ visitor_message2) | tojson}}
    },
    "tags": ["certainly_chatbot", "{{dynamic_tag}}"],
    "ticket_form_id": 360003653593,
    "custom_fields": [{"id": 360007562940, "value": "Field value"}]
  }
}
- "tags": ["certainly_chatbot", "{{userTag}}"] - Creates two tags for the ticket. The first tag is "certainly_chatbot" and the second one is the value of the CVar dynamic_tag. If the variable is an empty string "", the second tag is ignored.
- "ticket_form_id": 360003653593 - Zendesk's form ID. Note that this is an integer, without double quotes. If you don't use forms, simply delete this line. An Enterprise-level Zendesk Support subscription is required to use forms.
- "custom_fields": [{"id": 360007562940, "value": "Field value"}] - Custom field ID and its value. You can only refer to the custom field by its number. You can find it in the Zendesk field configuration. If you need to pass more than one field, use the following syntax: [{"id": 1, "value": "fv1"},{"id": 2, "value": "fv2"}]. Note that the "drop-down list", "checkbox", and "multi-select" custom fields automatically add tags.
For more information about the different types of custom fields, please refer to Zendesk's documentation on setting custom field values.
Ticket with chat transcript and HTML comment
This configuration assumes you call the ![]() Certainly Get Conversation History Webhook prior, so the CVar chatHistory contains the transcript of the chat. It also uses "html_body" for rich formatting of the ticket's comment.
Certainly Get Conversation History Webhook prior, so the CVar chatHistory contains the transcript of the chat. It also uses "html_body" for rich formatting of the ticket's comment.
This is the recommended default body for the Webhook.
{
  "ticket": {
    "requester": {
      "name": "{{visitor_name}}",
      "email": "{{visitor_email}}"
    },
    "subject" : "Ticket created from a conversation with Certainly",
    "priority" : "normal",
    "type" : "task",
    "comment": {
      "html_body": {%- if chatHistory is defined and chatHistory!= "" -%}
                {{chatHistory|replace("[Human]","<br><b>[Human]</b>")|replace("[Bot]","<br><b>[Bot]</b>")|tojson}}
              {%- else -%}
                "Full conversation with the chatbot https://app.certainly.io/inbox/{{certainly.botId}}/{{certainly.sessionId}}"
              {%- endif %},
      "public": false
    },
    "tags": ["created_by_certainly", "handed_over_by_certainly"]
  }
}
Adding more comments to the ticket
Sometimes you may need to add another comment to the ticket or split one comment in two.
For this case, use the ![]() Zendesk Support Update Ticket Webhook. You'll need to call it after
Zendesk Support Update Ticket Webhook. You'll need to call it after ![]() Zendesk Support Create Ticket so the zendesk_ticket_id and zendesk_requester_id CVars are populated with proper values. In the body of the Webhook, you can specify the visibility of the comment (public or internal) and the status of the ticket (open, solved, and so on).
Zendesk Support Create Ticket so the zendesk_ticket_id and zendesk_requester_id CVars are populated with proper values. In the body of the Webhook, you can specify the visibility of the comment (public or internal) and the status of the ticket (open, solved, and so on).
Testing the Webhook
- Save the Webhook.
- Replace all CVars in the parameters and body with values. For example, replace the CVar "visitor_email" with "test@test.com".
- Select Run. The response should appear and the zendesk_ticket_id CVar should be populated with the number of the ticket.
Have any questions? Just reach out to our Customer Success team.