This integration allows your Certainly chatbot to hand over a live conversation to Zendesk by switching between the two widgets. The article below covers the following:
- Introduction to the solution
- Prerequisites
- How to configure the handover flow
- How to deploy the Live Chat integration on your website
- Custom Variables used by the extension
Introduction to the solution
With this widget switch solution, both the Zendesk and Certainly Widgets are loaded on a webpage, but only one of them is shown at a time. Once the chat is handed over to Zendesk, the extension hides the Certainly Widget and activates the Zendesk Widget. After the Zendesk chat is over, the Zendesk Widget is hidden, and the Certainly Widget is displayed again.
When the conversation is handed over to Zendesk Chat, it is labeled with the tags "chat_with_certainly" and "handed_over_by_certainly". Your agents can pick up the conversation from the Zendesk Workspace and help visitors solve the claim. Once the chat on Zendesk ends, Certainly takes over the conversation.
You can check out a video of the solution below:
Prerequisites
Before building the flow, you'll need to ensure the following criteria are met:
- The Agent Workspace must be enabled for your Zendesk account.
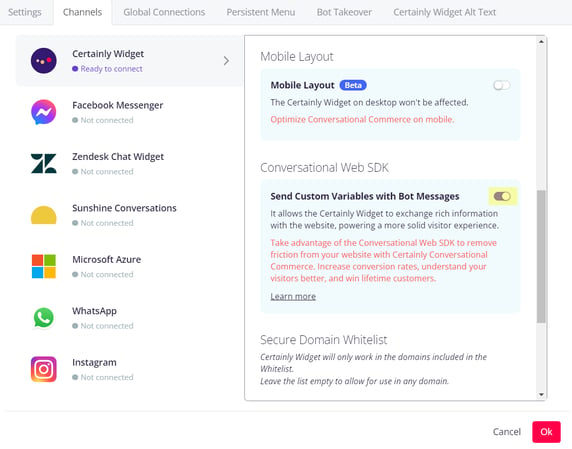
- The "Send Custom Variables with Bot Messages" toggle must be activated in the Certainly Widget channel. Access this by navigating to Bot Settings via the right sidebar menu, then Channels > Certainly Widget > Conversational Web SDK.
How to configure the handover flow
Now we'll explore the recommended flow for handover to Zendesk Live Chat, as shown here: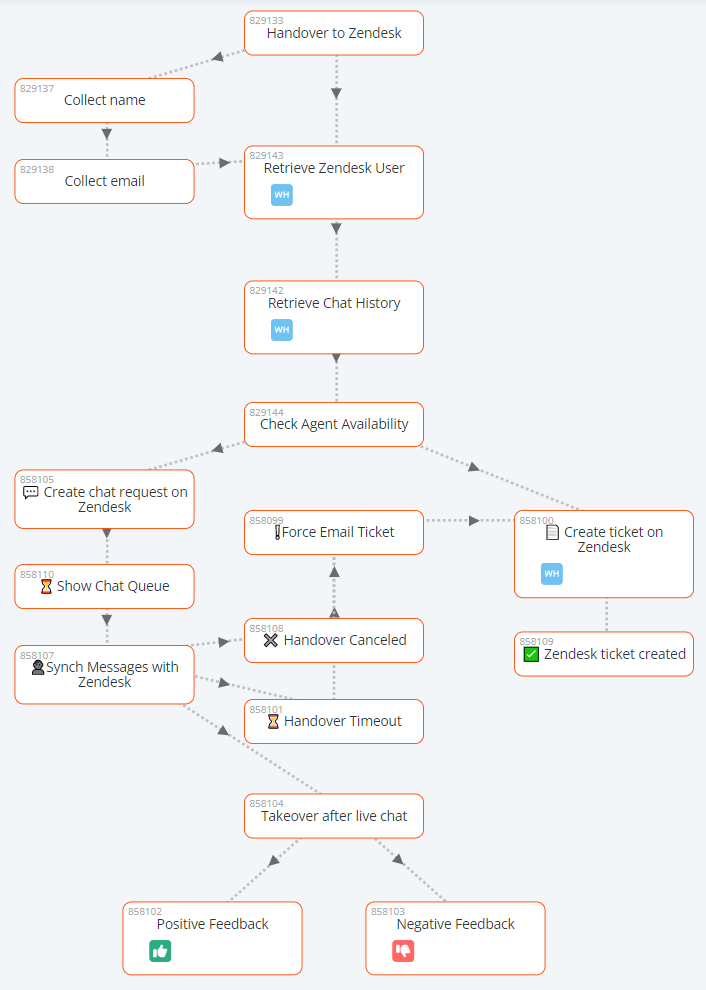
You can ask our Customer Success team to copy this flow into your bot.
- First, the bot collects the visitor's name and email in the visitor_name and visitor_email CVars. If visitor_email is already set, the bot retrieves the visitor's record from Zendesk, skipping collecting name and email.
- Then the bot checks for agent availability. To do so, the CVar zendesk must be set with the value agent_availability in the Connections tab of the Retrieve Chat History Module:
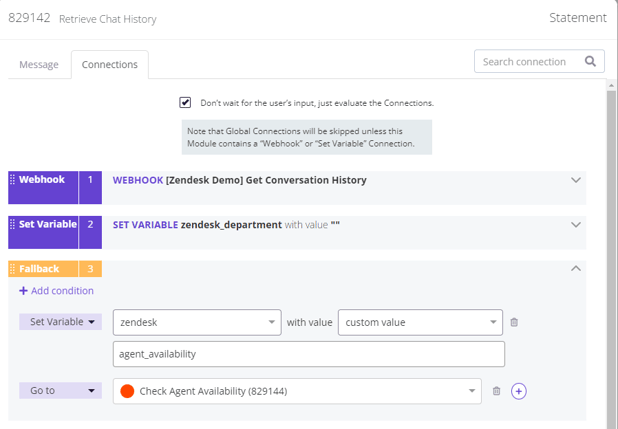
To check the availability of a particular department, you can specify the department name in the zendesk_department CVar. Otherwise, an agent will be considered available if there is availability in at least one department.
In the next Module, Check Agent Availability, you'll reset the CVar zendesk to an empty string, making sure that "Don't wait for the user's input" is unchecked.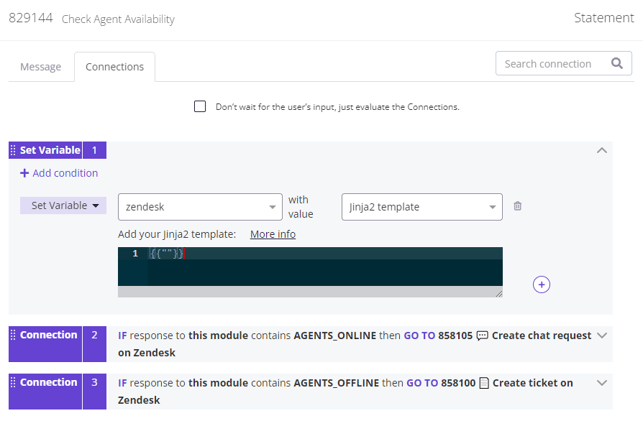
The bot will receive a message from the extension of either AGENTS_ONLINE or AGENTS_OFFLINE, which determines whether the bot will create a chat request or a ticket.
-
To hand over to Zendesk Live Chat, the CVar zendesk must be set with the value start_chat in the Create chat request Module, then the conversation moves to Show Chat Queue.
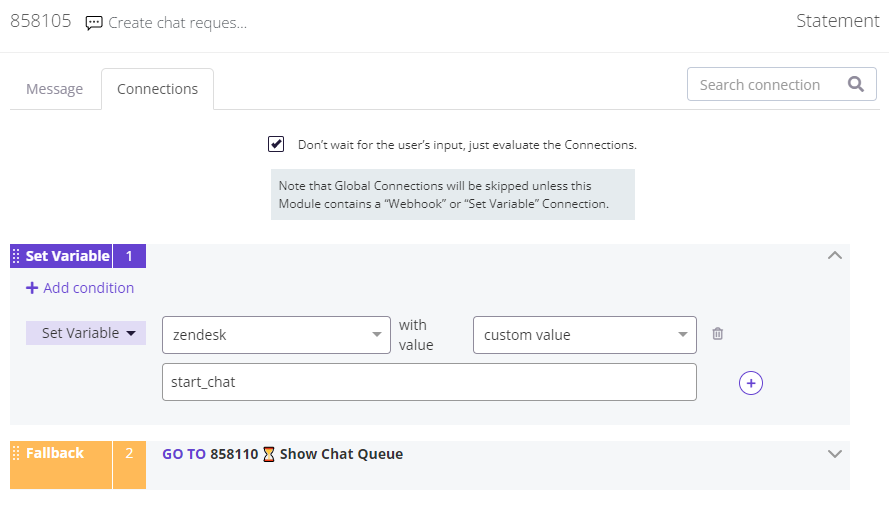
- In the Show Chat Queue Module, you'll set the CVar zendesk with an empty string value so the extension won't try to initiate the Live Chat anymore.
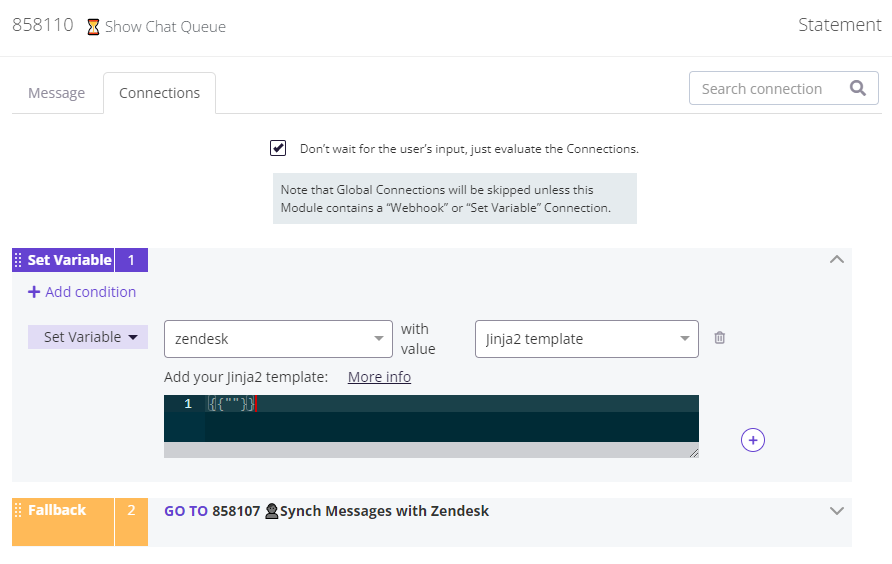
Once a chat request is created, a countdown clock overlay is shown as the visitor waits for an agent to pick up the chat. You can set the wait time in the chat_queue_timeout CVar.
During this time, the visitor has the option to cancel the request, which will send the hidden message QUEUE_CANCELED from the extension to the bot. If the timer expires, the extension sends the hidden message QUEUE_TIMEOUT. In both cases, the visitor can choose to be contacted by an agent via email instead.
-
When a Zendesk agent takes over the conversation, the Certainly Widget is hidden and the Zendesk Widget is displayed. The Zendesk chat is assigned to the department specified in the zendesk_department CVar, if applicable. If nothing was specified, it is up to Zendesk which department is used.
After the Zendesk chat ends, the extension sends the hidden message CERTAINLY_TAKEOVER to the bot, and the bot takes over the conversation.
How to deploy the Live Chat integration on your website
Finally, to complete this integration, you must deploy both Zendesk Chat and the Certainly Widget on your website. To do so, embed the snippet below into your website.
Make sure you replace:
- the Zendesk Chat script with your own snippet from Zendesk
- the Certainly id with your own bot deployment ID
<!--Zendesk Chat Widget Start-->
<script id="ze-snippet" src="https://static.zdassets.com/ekr/snippet.js?key=66dca387-9072-4c5a-8eab-8b8508fcd9a3"></script>
<!--Zendesk Chat Widget End-->


<!--Certainly Widget Start-->
<script src="https://app.certainly.io/sdk/webchat.js"></script>
<script>
initCertainlyWidget({
  id: "4807d5c6-7fef-4ad5-8929-9b0d5c99a6b4",
  mode: "clear_past_conversations",
  cvars: {
    // You can pass metadata to Certainly
  }
});
</script>
<!--Certainly Widget End-->


<!--Zendesk extension for Certainly Start-->
<script src="https://scripts.certainly.io/extensions/zendesk/zendesk_switch.js"></script>
<!--Zendesk extension for Certainly End-->
That's it! Your Certainly bot is now ready to hand visitors over to Zendesk agents. If you encounter problems in the configuration, please reach out to our Customer Success team.
Custom Variables used by the extension
| Custom Variable | Example | Description |
| {{visitor_name}} | John Doe | Appears as a user name in Zendesk Chat |
| {{visitor_email}} | john@email.com | Used to match the user record in Zendesk |
| {{zendesk}} | agent_availability | When assigned, returns hidden message AGENTS_ONLINE or AGENTS_OFFLINE |
| start_chat | When assigned, triggers a switch to the Zendesk Widget | |
| {{zendesk_department}} | Support | Zendesk department name to check the availability of the agents and transfer the chat to |
| {{zendesk_tags}} | order_status, on-hold | Comma-separated list of tags that will be assigned to the corresponding Zendesk ticket |
| {{chat_queue_timeout}} | 90 | Wait time in seconds before an agent takes over the conversation, 60 sec by default |